Hardware Components and Behaviors
What is a Hardware Component (HWC)?
Hardware Components are all the elements found on a SKAARHOJ controller or any Raw Panel compatible device (e.g., xpanel-* applications).
Some physical components, such as a joystick, can be represented as multiple Hardware Components in Reactor (e.g., Up/Down, Left/Right, and Rotate).
There are four basic types of hardware components:
- Buttons (Binary Inputs)
- Faders/Potentiometers (Analog Inputs)
- Encoders (Pulsed Inputs)
- Joysticks (Speed/Intensity Inputs)
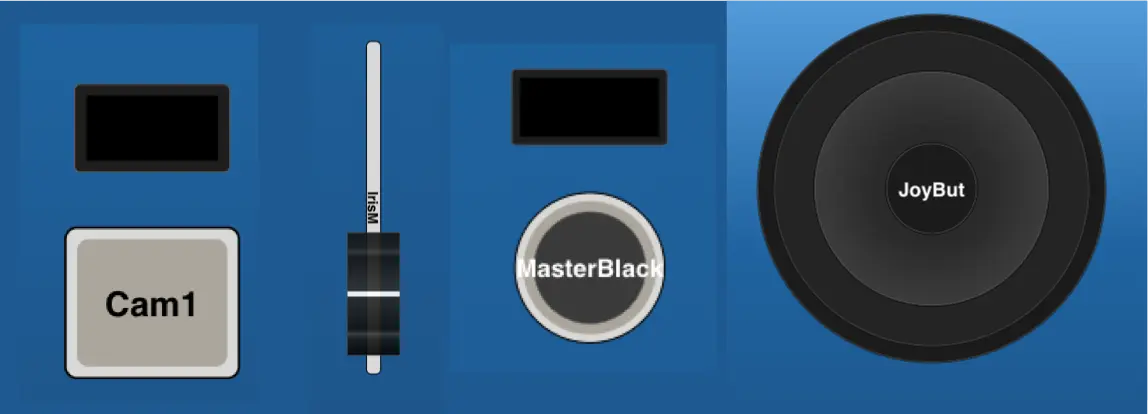
Additionally, these components may have various types of displays linked to them.
Buttons can have different types of color LEDs to indicate status.
Larger displays can consist of different Tiles, allowing you to configure individual parts separately and easily.
What is a Behavior?
To configure what a specific component does and shows, we need to assign a Behavior to it. Click any hardware component in the configurator view to access the Behavior defined for it. If no Behavior has been created for this component yet, the inspector will show a palette of pre-configured Behaviors based on the devices you've added in the Home Screen.
Clicked on a component and found a purple Generator? This component's behavior is likely defined by a Settings Table from the Home Screen. You can overlay it by selecting the User Section in the section dropdown. If you'd like to learn more or modify the generator, please refer to the chapter on generators.
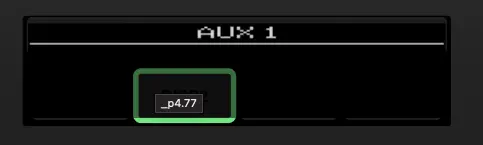
Selecting a Parameter
To select a Behavior, simply choose the component you want to modify. If no behavior has been defined for the component yet, you will see the behavior palette in the inspector. You can select any preconfigured parameter from the list of your devices.
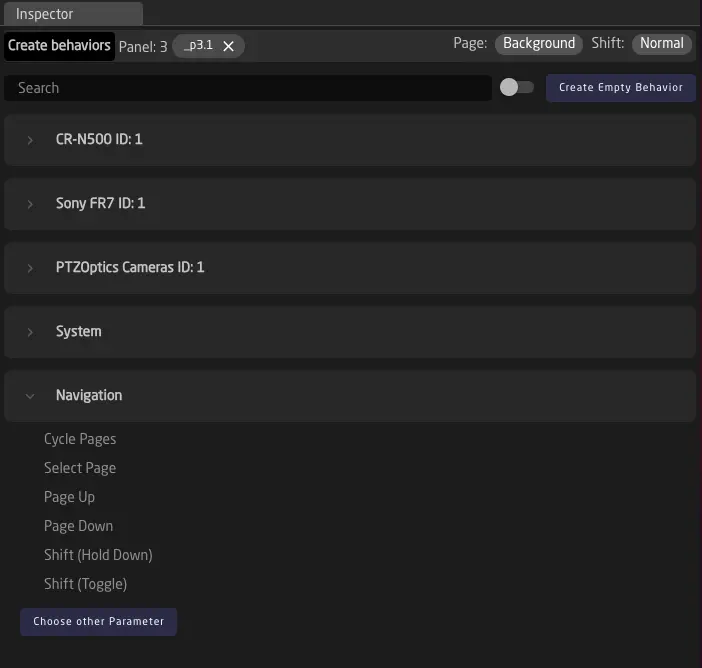
If you have selected a component that already has a configured behavior, you can click Change Behavior in the top right corner. This will reopen the behavior palette, allowing you to switch to a different one.
Manually Changing a Parameter in a Behavior
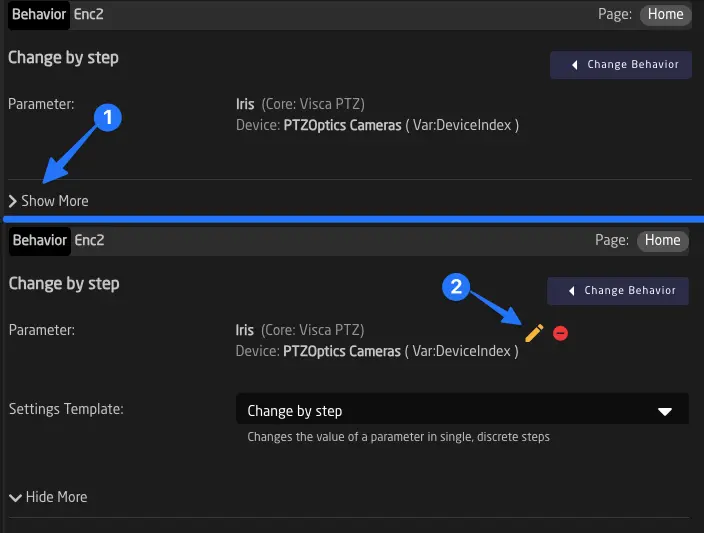
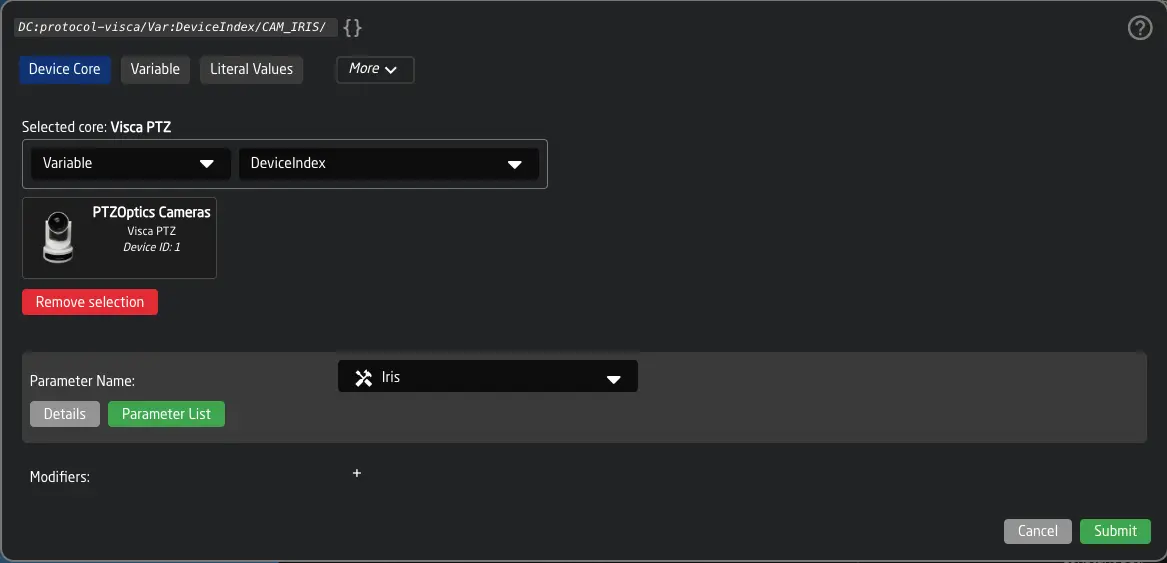
To manually edit a parameter inside a behavior (without using the preconfigured behaviors from the palette), click the Show More button. A yellow pen icon will appear next to the name of the parameter field. Click it and use the parameter reference helper window to configure the parameter you want.
Once you click submit, you will be presented with this window:
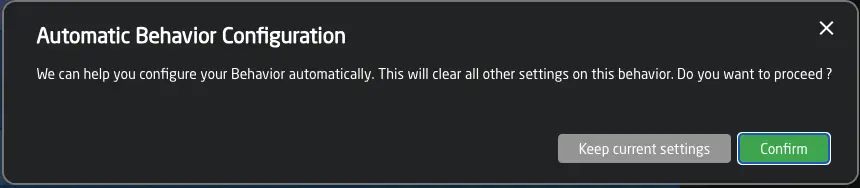
If you click the green Confirm button, you will use the Automatic Behavior Configuration.
This means Reactor will automatically select a Template Behavior and add configuration fields to your behavior. This makes it very quick to add almost any parameter to a component.
In some cases, you may want to keep the settings you have manually configured in the behavior. In these cases, simply click Keep current, and Reactor will only change the parameter reference.
Changing Template Behavior
Reactor does its best to choose the correct Template Behavior based on the type of component and the parameter you select. However, you may still want to change it. To do so, click Show More to display the Template Behavior dropdown.
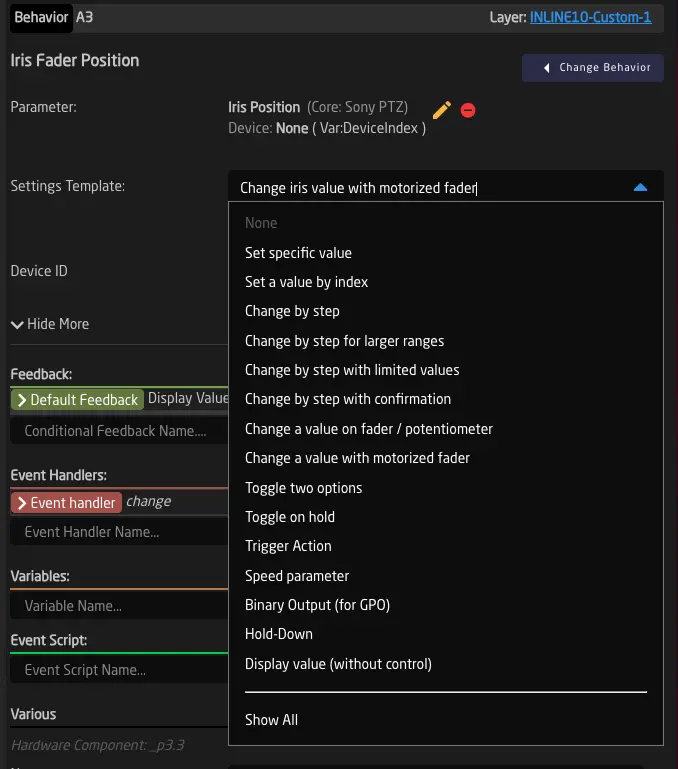
The Template Behavior dropdown shows the most commonly used templates at the top. If you have created Template Behaviors yourself, they will also appear. If you cannot find what you're looking for, click Show All to display more included Template Behaviors from Reactor.
Available Template Behaviors
Here is a list of the most important Template Behaviors included in Reactor.
Set specific value
Set specific value
Use this template if you want any action on the component to set a specified value on the selected parameter.
Example: Setting an AUX of an ATEM to input 1 using a button.
Set a value by index
Set a value by index
Same as "Set specific value," but you can specify an index of the option for the specific parameter.
Example: Setting the current Scene in OBS to the 5th scene from the start.
Change by Step
Change by Step
Use this when you want to move a value up and down using an encoder or Four-Way button.
Example: Use an encoder to control the current shutter speed of a camera.
This Template Behavior is the most versatile one. It is almost always usable.
Change by step for larger ranges
Change by step for larger ranges
Same as "Change by step," but for larger value ranges.
- Encoders will move more steps if rotated faster, and a fine/coarse selection can be made by pressing down shortly.
- Buttons will continue to increment when held down. Example: Changing the electronic shutter in 0.01 values of a degree.
Change by step with limited values
Change by step with limited values
Sometimes a parameter has many options, but you want to limit the options selectable with the current button or encoder. Use this template to define several valid options for the parameter.
Example: Making an encoder only switch between three specific white balance modes (e.g., Manual/Preset1/Preset2).
Change by step with confirmation
Change by step with confirmation
Use this template on encoders and Four-Way buttons if you want the user to select a value first, then confirm the change by pressing down.
If no change is confirmed, the value will revert to the current one after the specified time.1
Example: Loading a new setup file on an Arri Camera. Use left and right on an encoder to select, then press down to confirm.
Change a value on fader / potentiometer
Change a value on fader / potentiometer
This is the default Template Behavior for mapping a parameter to a fader or LEDBar.
Example: Controlling Gain on an RCP joystick.
Change a value with motorized fader
Change a value with motorized fader
This is the default Template Behavior for mapping a parameter to a motorized fader. It correctly sends back the position to the fader if the value changes in the system.
Example: Controlling Iris using a Color Fly V2 fader.
Toggle two options
Toggle two options
Choose this Template Behavior for any On/Off, Show/Hide, Enable/Disable scenarios. The button will light up bright when the function is activated and dim when inactive. Example: Turning on/off bars on a camera.
Toggle on hold
Toggle on hold
This Template Behavior works similarly to "Toggle two options," but the action is triggered only after holding the button down for a specified time (default: 1000 milliseconds).
Example: A NETIO power outlet is toggled only when the button is held down for one second.
Trigger Action
Trigger Action
Use this template for any one-shot parameters (commands).
Example: Triggering OnePush Autofocus on a camera.
Speed parameter
Speed parameter
This is the default Template Behavior for mapping speed components (joysticks). It can also control speed commands from other components like encoders.
Example: Control Pan speed using a joystick.
Binary Output (for GPO)
Binary Output (for GPO)
This Template Behavior sets or clears the output of a GPO contact on RCPs or Link IO boxes using the parameter.
Example: Map a Tally Flag to the closed contact on the back of an RCP.
Hold-Down
Hold-Down
Used for parameters with two options. When the button is pressed down, the parameter is set to "on." When released, it is set to "off."
Example: Mapping Record to the state of a GPI closed contact of an RCP.
Hold down with values
Hold down with values
Similar to Hold-Down, but sends specific user-defined values for press and release instead of index 0/1. When the button is pressed down, it sends the configured "Press Value." When the button is released, it sends the configured "Release Value."
Example: Sending specific command values to a device on press and release, where the on/off values are not simply index 0 and 1.
Display value (without control)
Display value (without control)
Show a value without control or deliberately lock control of a value.
Example: Display the battery voltage of a camera.
Custom Template Behaviors
You can also create your own Template Behaviors. See the chapter Template Behaviors in Advanced Configuration.
MultiBehaviors
To combine multiple behaviors on a single hardware component — for example, creating sequences with delays, combining encoder rotation and press actions, or switching behavior based on a variable — see MultiBehaviors.
-
Before Reactor v2.0.5-pre5, this required a ':Confirm:1000' modifier and only worked on devicecore parameters. In later versions, this Template Behavior works without any extra configuration steps. The old Template Behavior was called 'SKAARHOJ:Confirm,' while the new one is called 'SKAARHOJ:ConfirmValue.' ↩