Settings Tables and Generators
Settings Tables and Generators allow Reactor to provide complex dynamic configurations. This mechanism is primarily used in SKAARHOJ Default Configurations, but can allow you to build dynamic configurations yourself, that can be adapted very quickly from the home screen.
Common usecases for Settings Tables can be
- Storing configuration that can be changed directly on the Homescreen
- Generating layers with behaviors based on table rows
- Creating several Virtual Triggers based on table rows
In the following sections we will take a look into each of these usecases.
Setting Tables
Settings Tables, like all other tree elements, follow inheritance. (See Tree Chapter)
Examples of Settings Tables in default configurations include:
- Camera Selector
- Tally Forwarding
- Routing Triggers
- GPIO Mappings
- (See more here: Default Configurations)
Reactor's fields are values embedded in the configuration code, used for various purposes within the configuration. Unlike variables, fields can only be modified by altering the configuration.
Settings Tables in Reactor are essentially tables of related fields (this is why they have been known as Constant Sets in earlier versions of Reactor). Each row forms a set of field values, and columns represent different fields within these sets.
They can be used for a variety of functions, such as setting switcher inputs or configuring a PTZ controller's camera selector. Simpler uses might include single-row Settings Tables for configuring specific aspects of a configuration, such as the number of cameras on a page.
Example 1: Storing configuration that can be changed directly on the Home Screen
In this example we will create a simple Settings Table, that allows us to change the first button's color from the home screen. This is just an example. Using this technique you could use any kind of setting, control layer visibilities, button behaviors, default colors or other aspects of your configuration directly from the Homescreen. This can be great to build simple configs that can be customized by less technical users.
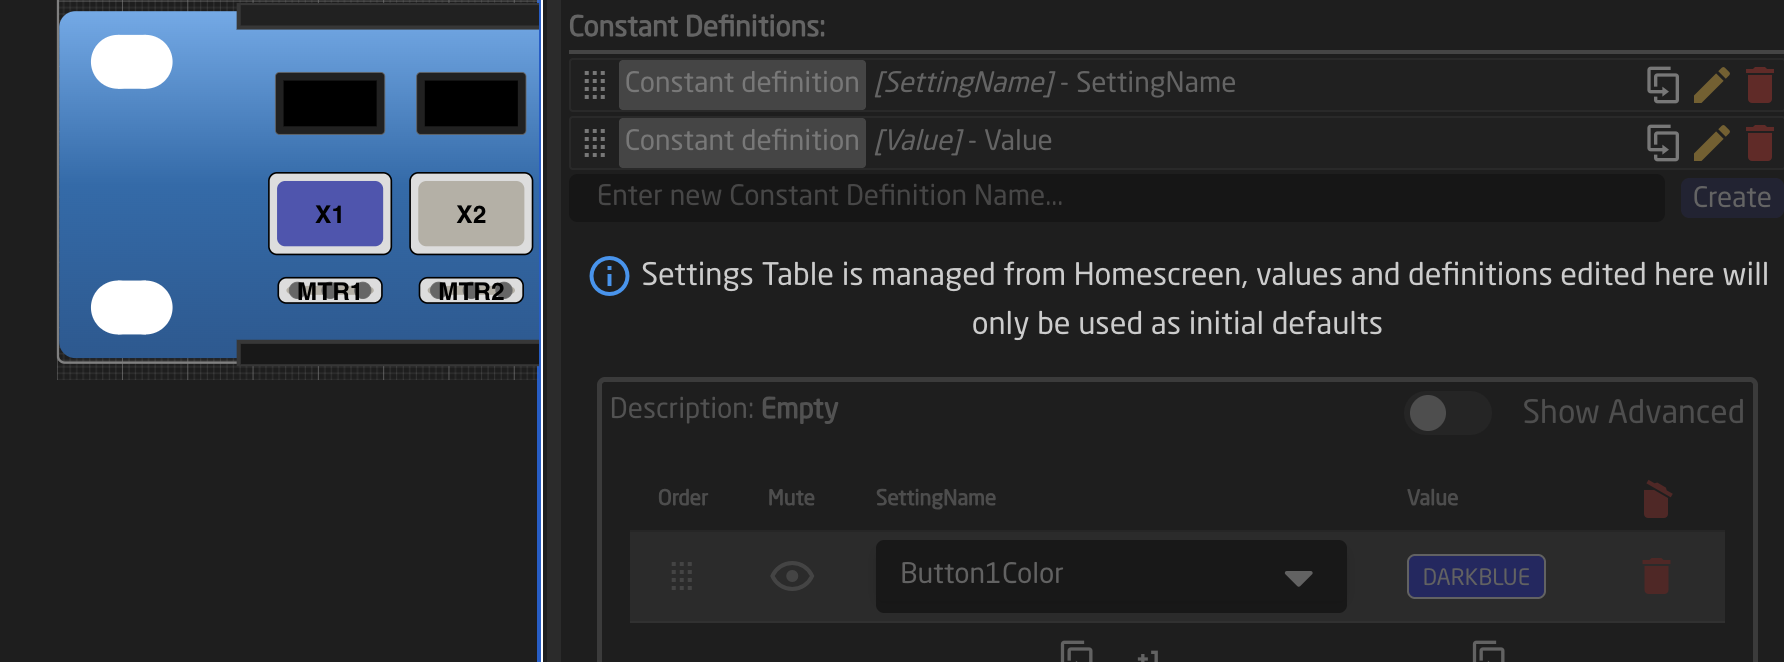
To create a new Settings Table for a controller simply click on your controllers black or blue background (1), open Show More (2) in the inspector and add a new Settings table
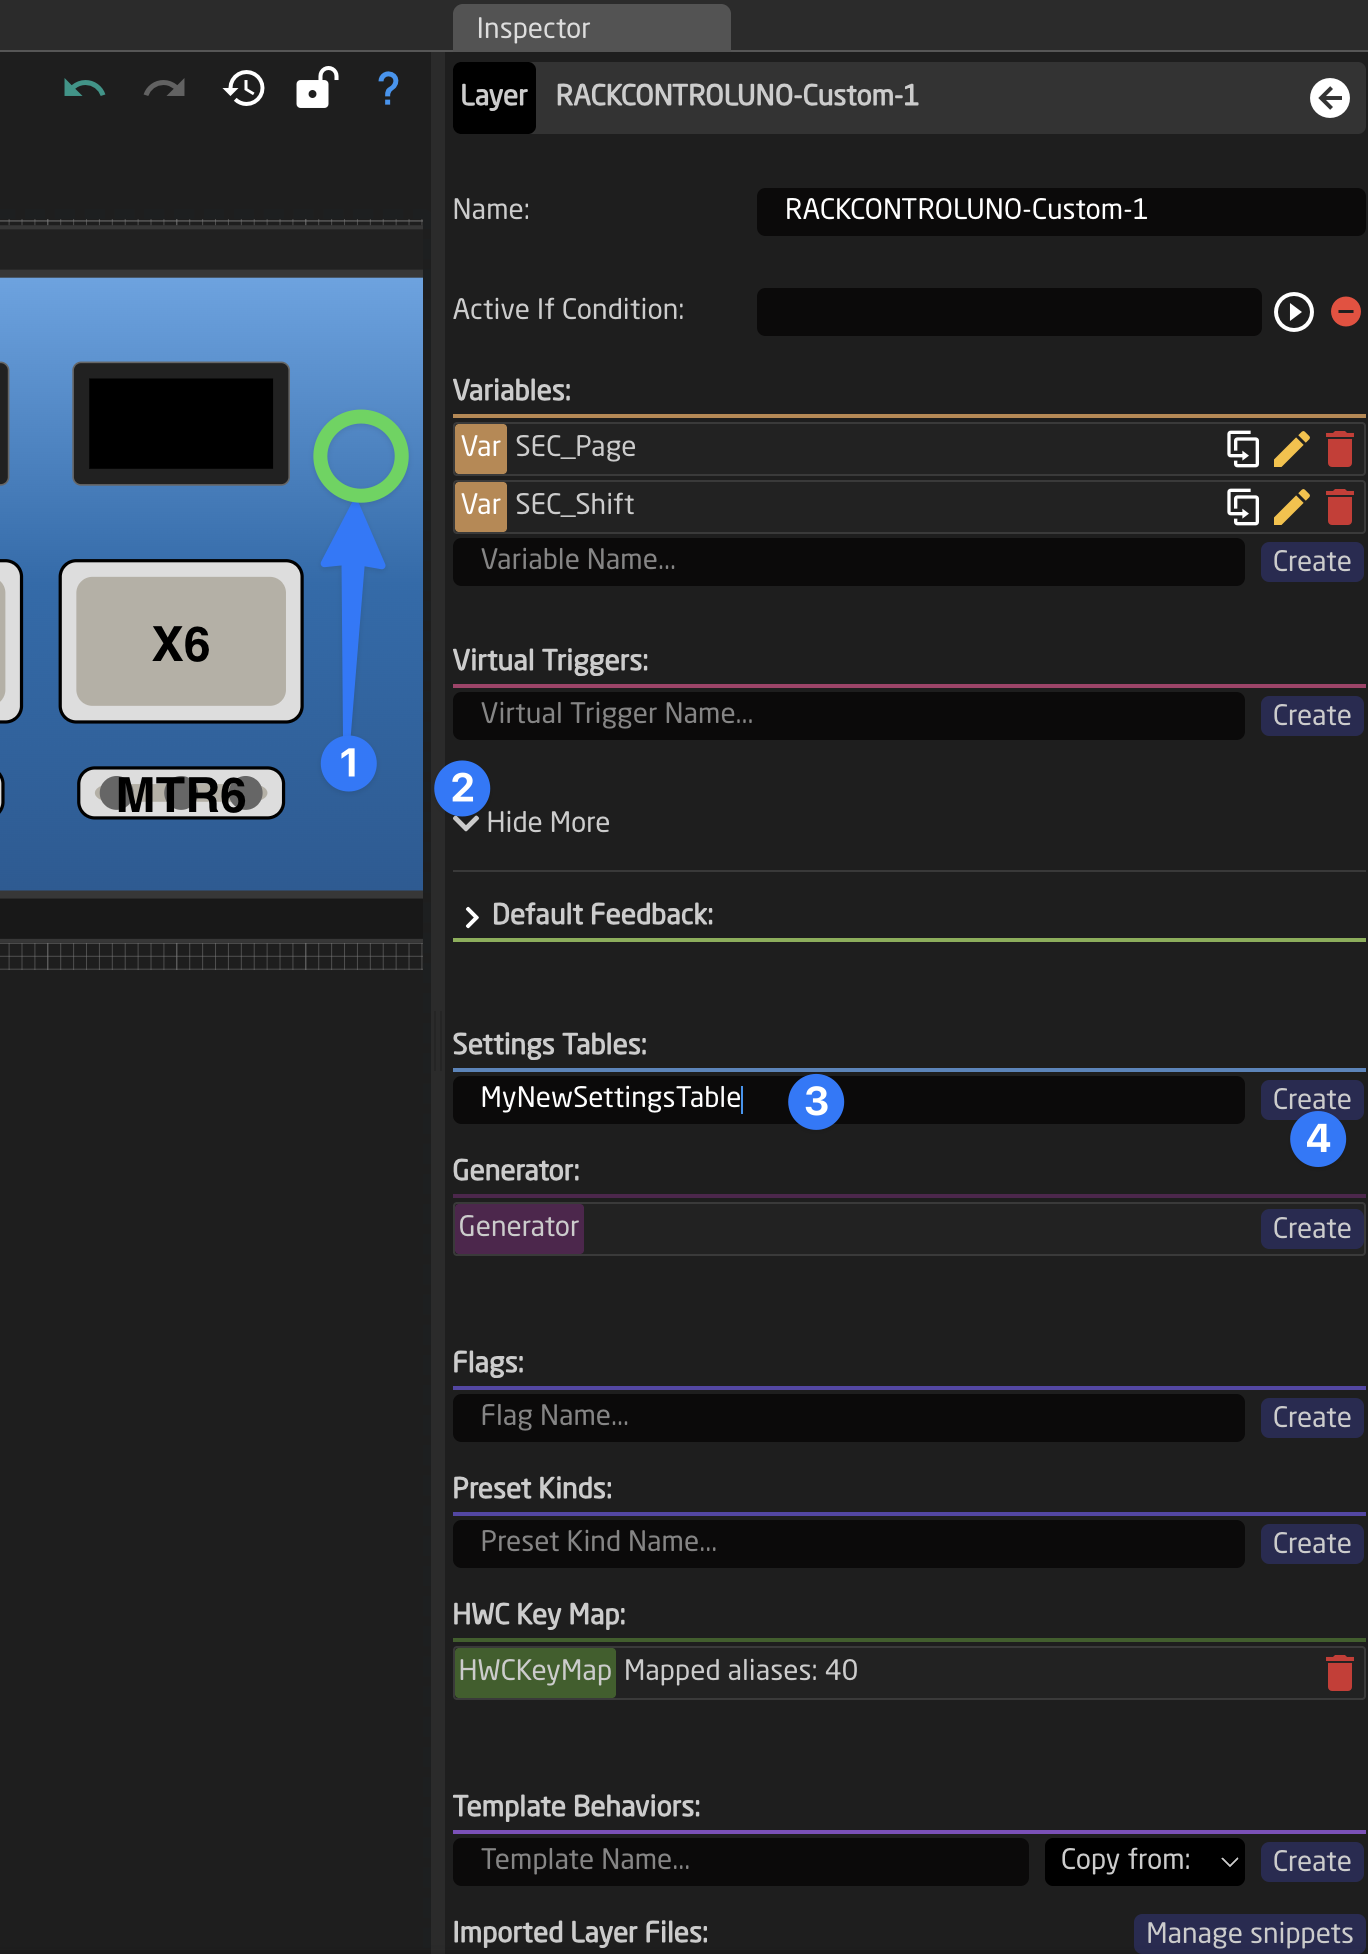
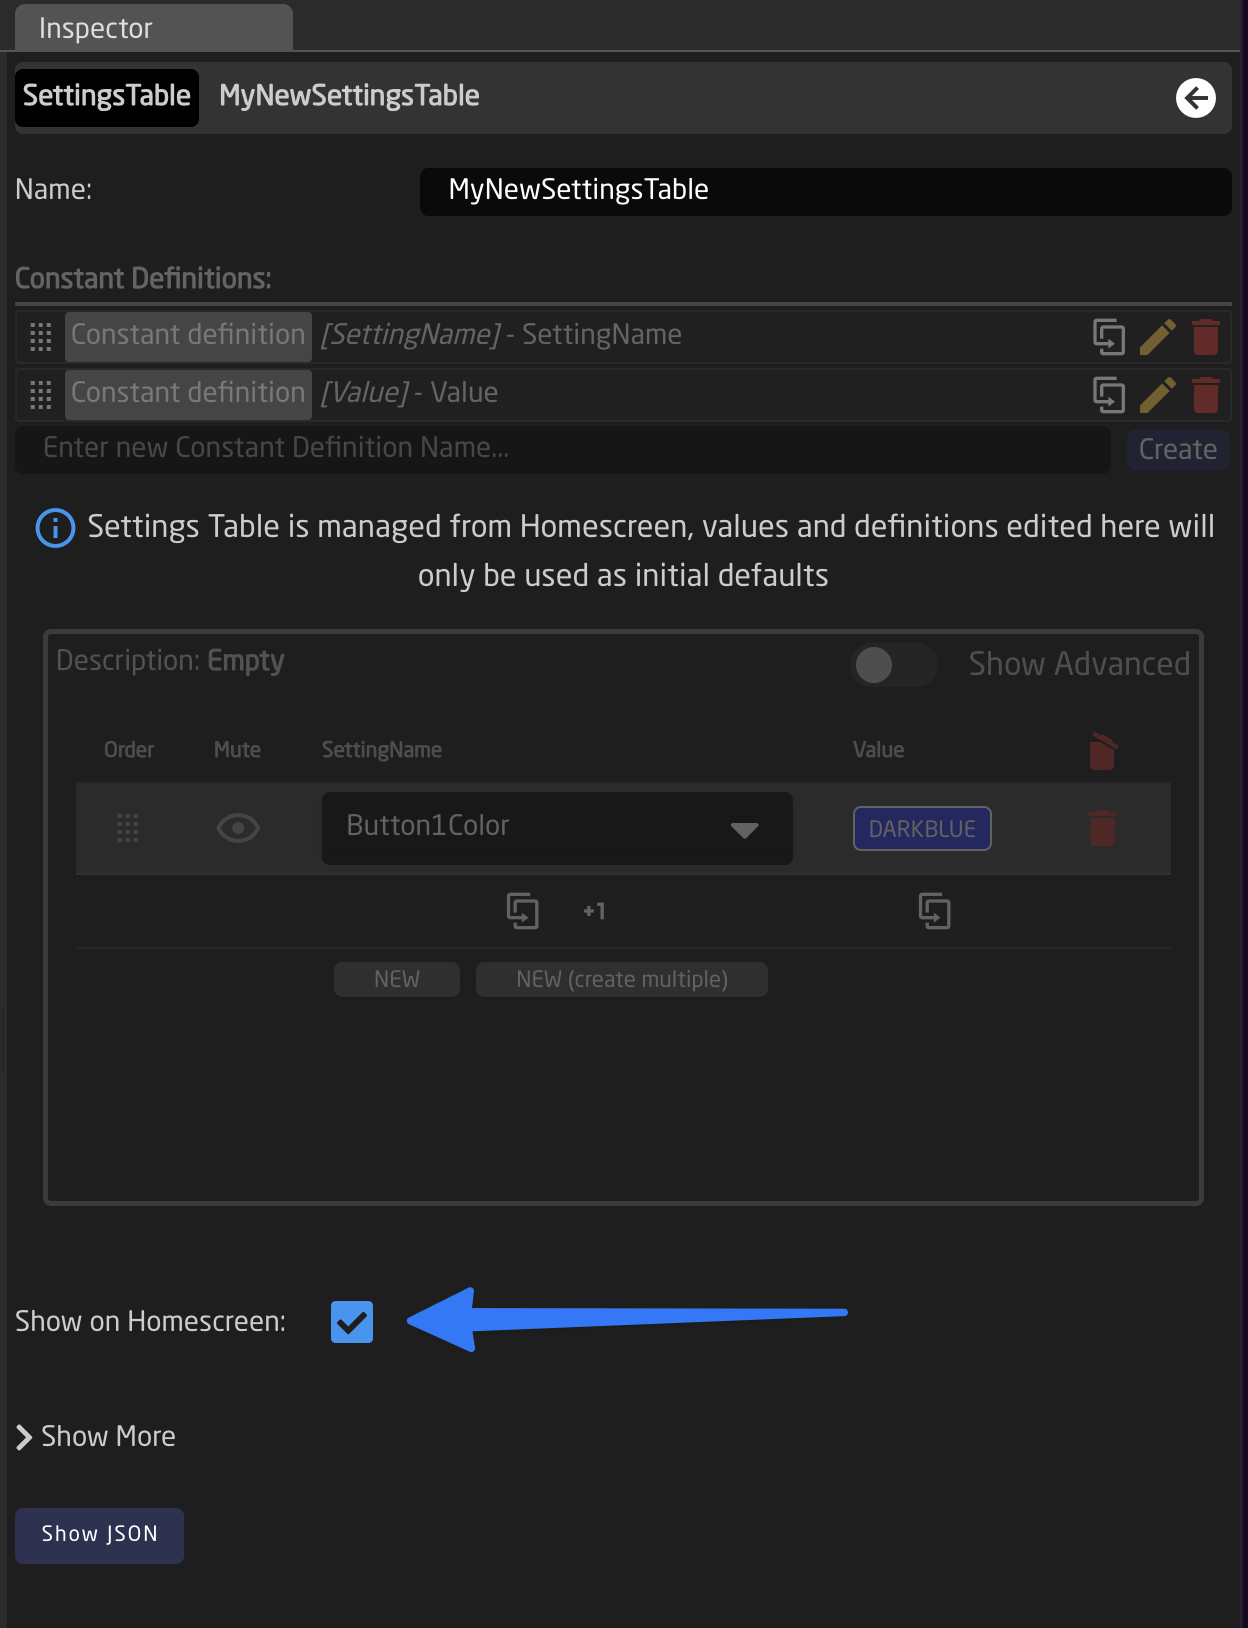
Next click on the name of your new settings table to open it in the inspector. You will see a blank table without any columns (fields). To add some columns let's add Field Definitions. You can do that easily by creating them in the top of the Settings Table inspector
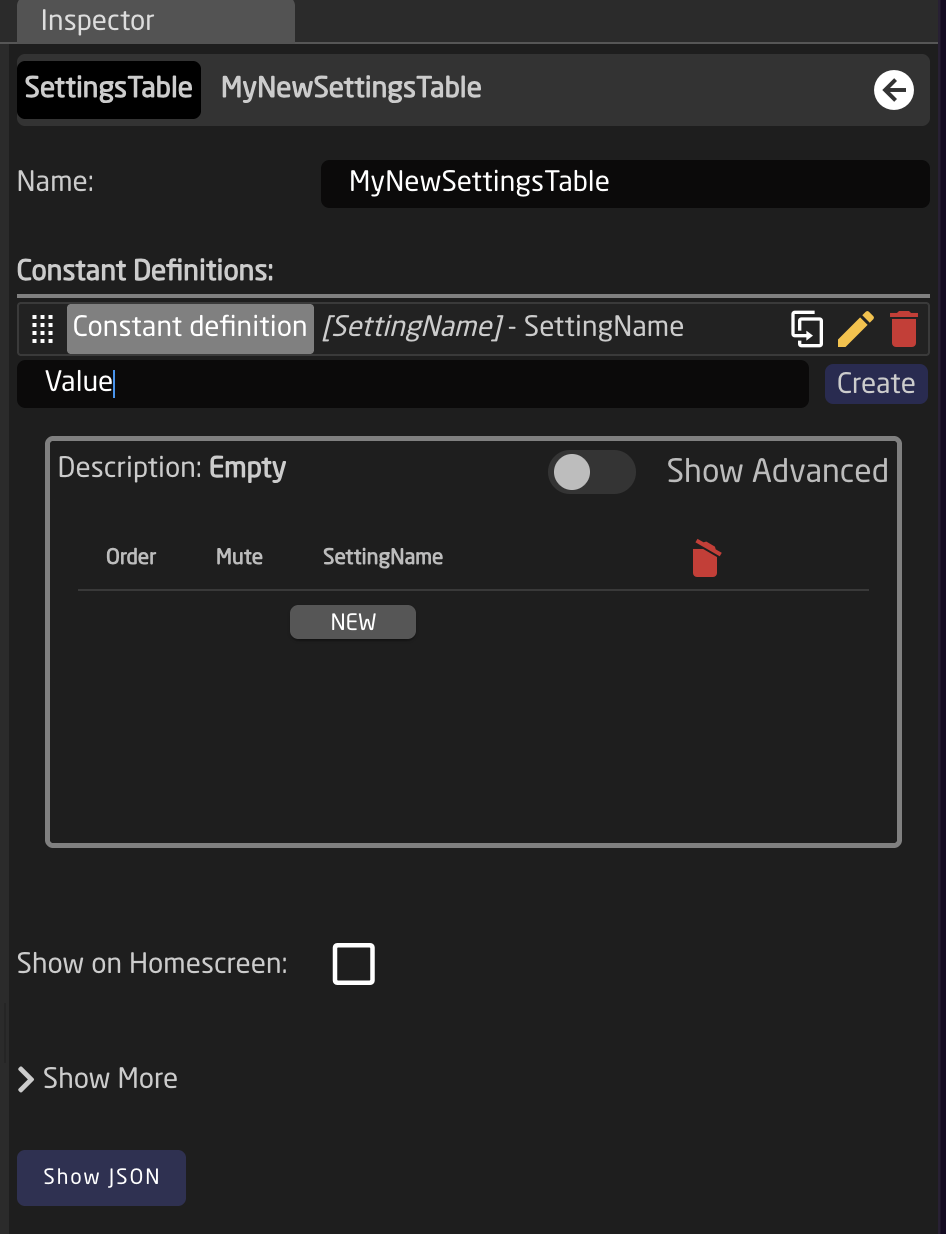
By default new Fields will have the type String, but this can be quickly changed, by clicking the field and selecting a different type from the dropdown. You can also open show more and check if the field should have a label or not. You can use the back button in the right top corner of the inspector to get back.
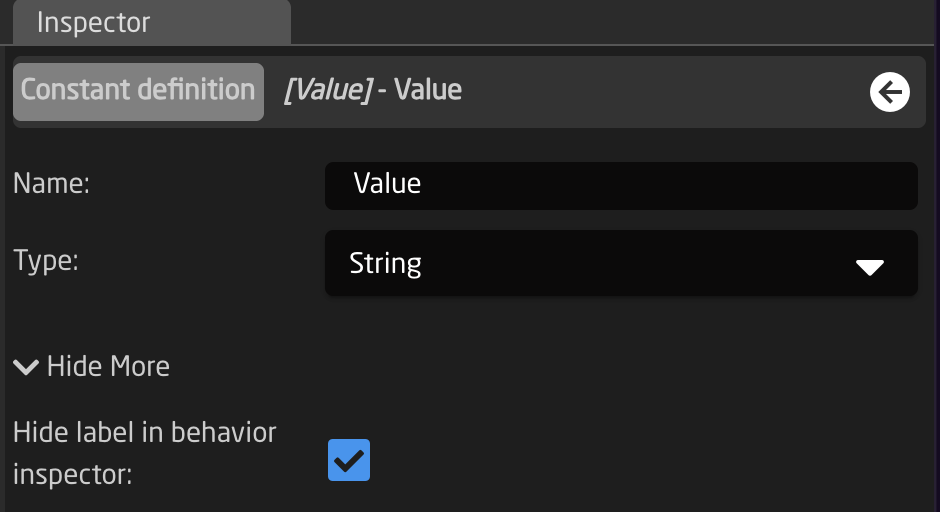
Lets create 2 Fields: a SettingName and a Value. SettingName should be a String and Value a Color. Afterwards you can add the first row into the Table.
We can now open Show More and select Show on Homescreen in the bottom. This way we can now edit the contents from the home screen. Notice that you can not edit your Settings Table from the Configuration Page directly anymore.
Explanation
Explanation
Why can't I edit it from Inspector anymore once it is shown on Homescreen ?
When 'Show on home screen' is activated the data is copied to the Link Layer. You can make this visible by open the view settings (cogwheel in the bottom right corner of the screen) and enable 'Show Include Layers'.
This is done so that different controllers using the same configuration snippet (selected on home screen) can have different values. If you like to make changes you should make sure you have your table data backuped somewhere and then uncheck 'Show on Homescreen', edit and recheck the box. Then restore your table data (needs to be done manually).
Your Settings Table should look like this:
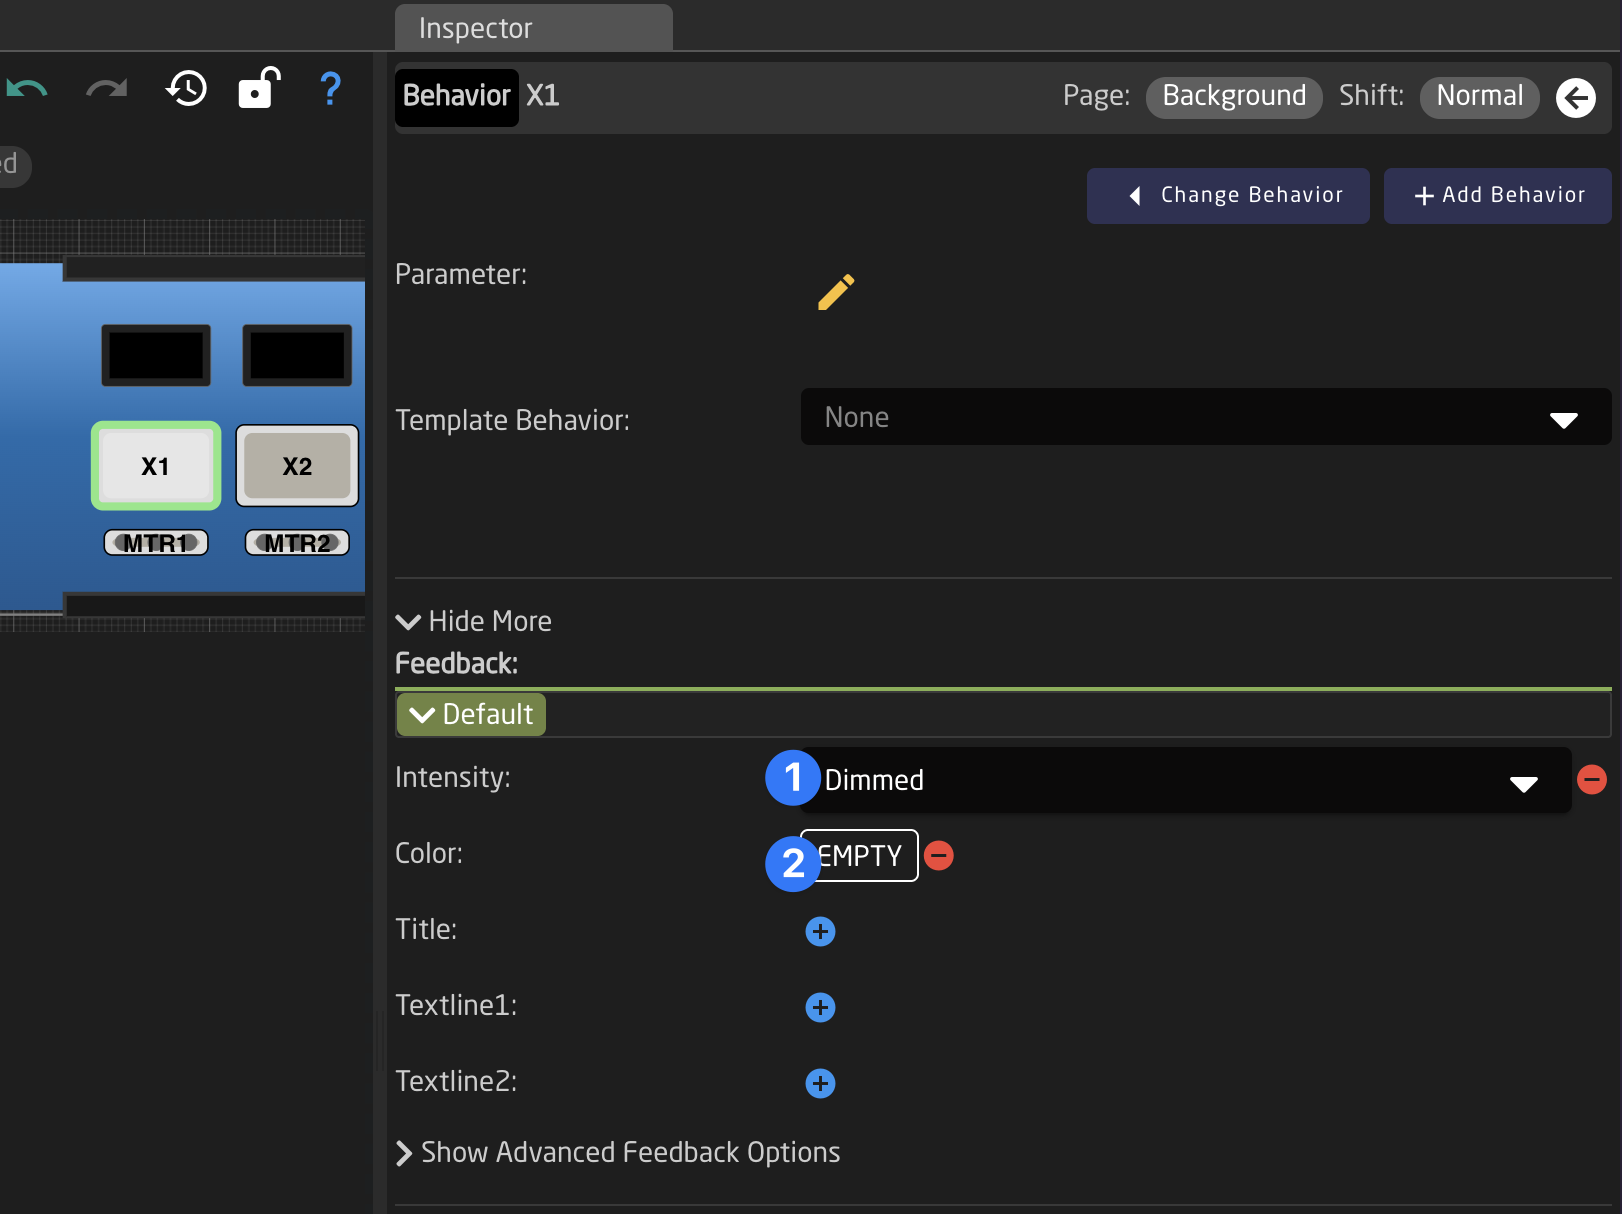
To make our newly created table actually do something we will create a empty Behavior on the first button of our controller Then we need to select Intensity: Dimmed and add a Color, open the color picker window by clicking on the 'Empty' Text.
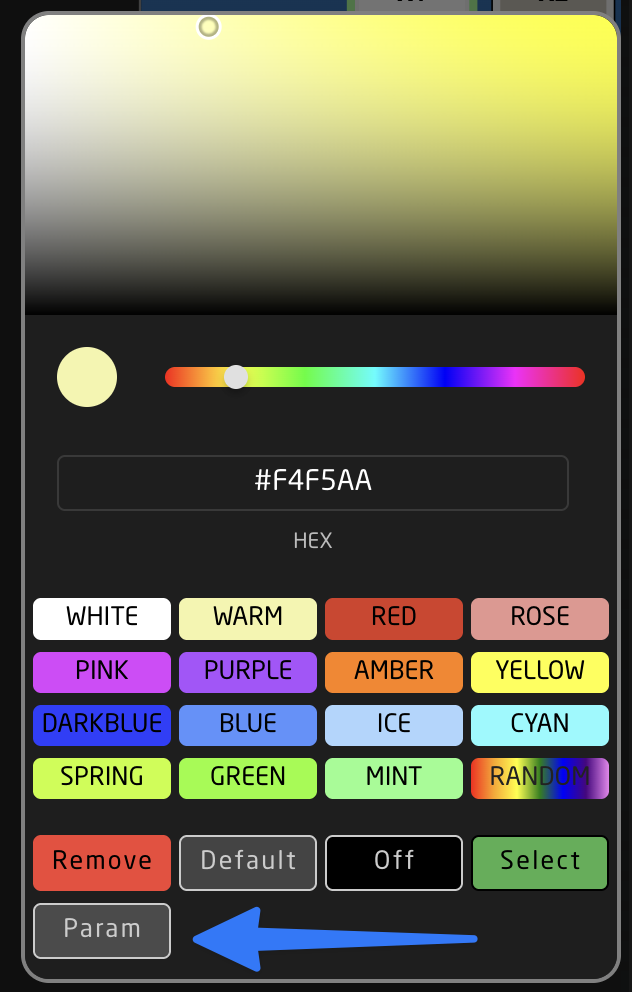
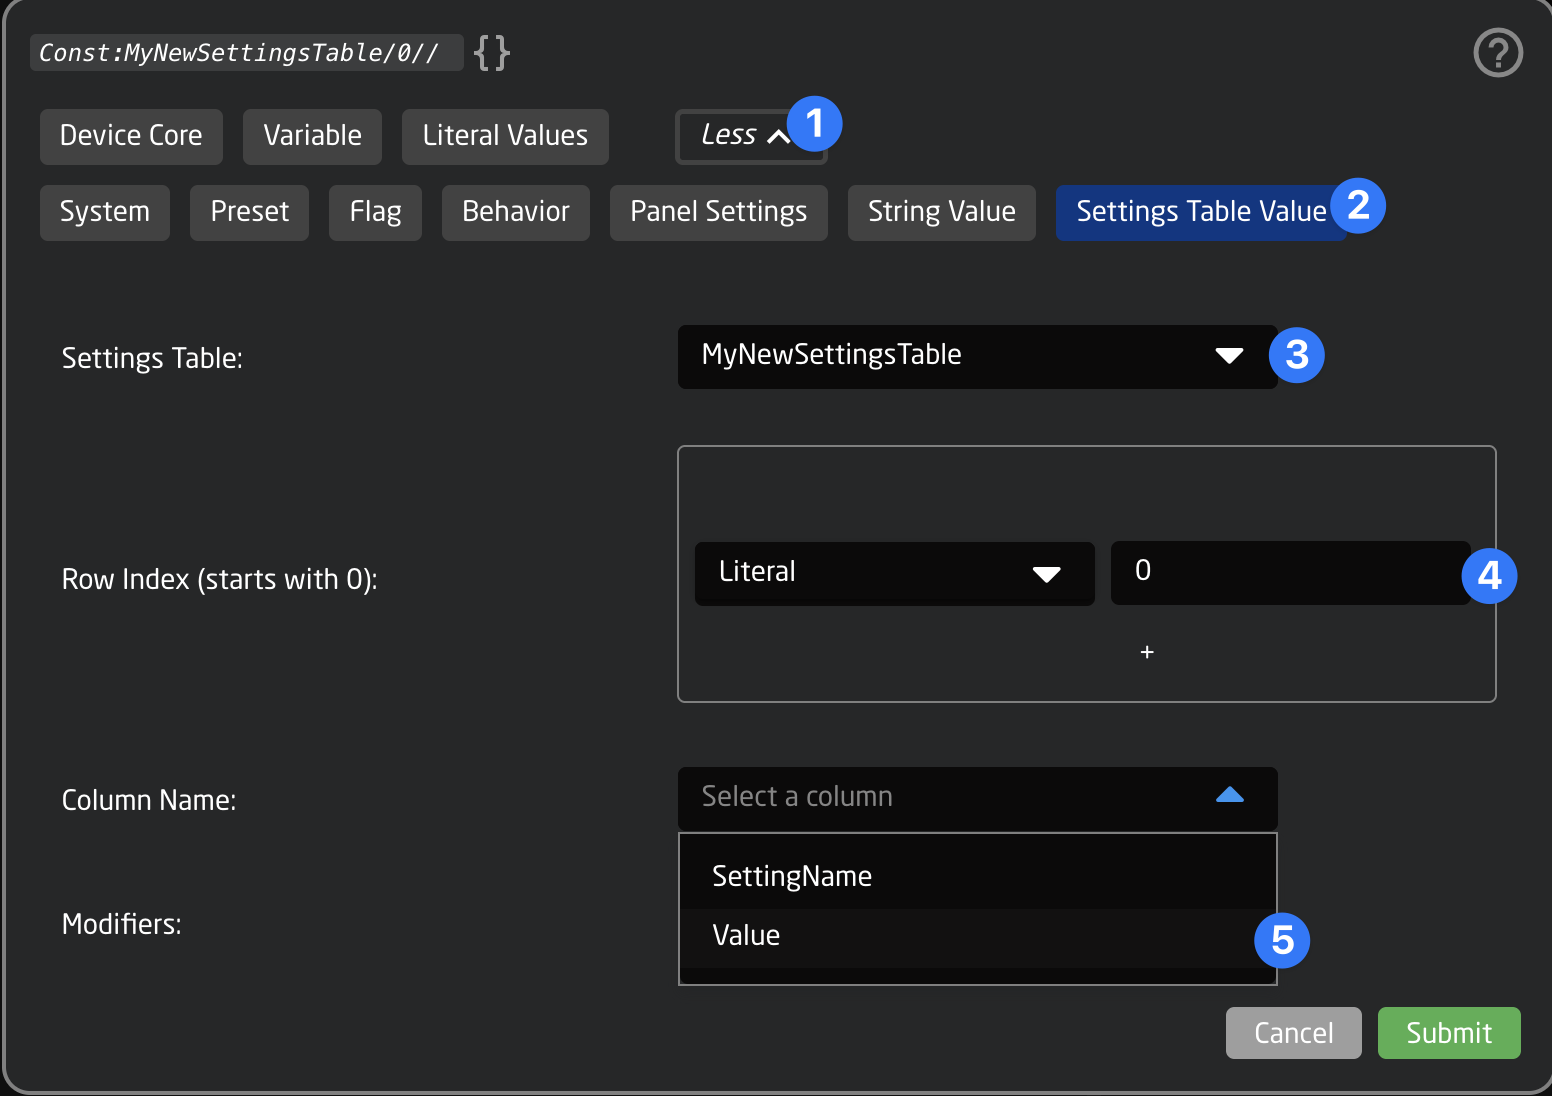
Now select 'Param' in the color picker, and a Parameter Helper Window will open. Here we can now directly select 'Settings Table' and pick our row (0 in this case) and select the Value field.
Great! 🎉
The button now shines in the color that is selected in the table from Homescreen
Example 2: Creating Several Virtual Triggers from a Table
Another use case is to create several, similar Virtual Triggers, one for each row in a Settings Table. This can be useful if you want to listen for a change of a parameter for several cameras, or trigger complex routings on an ATEM mixer, depending on the state of its inputs.
For our example we want to create a table of Aux Channels. We will create a Virtual Trigger that can link an AUX Channel from one ATEM Mixer to another. Users can then add or remove rows to the Settings Table and therefore link or unlink Aux Channels between the two devices. This is just an example, there are many other things that can be done here
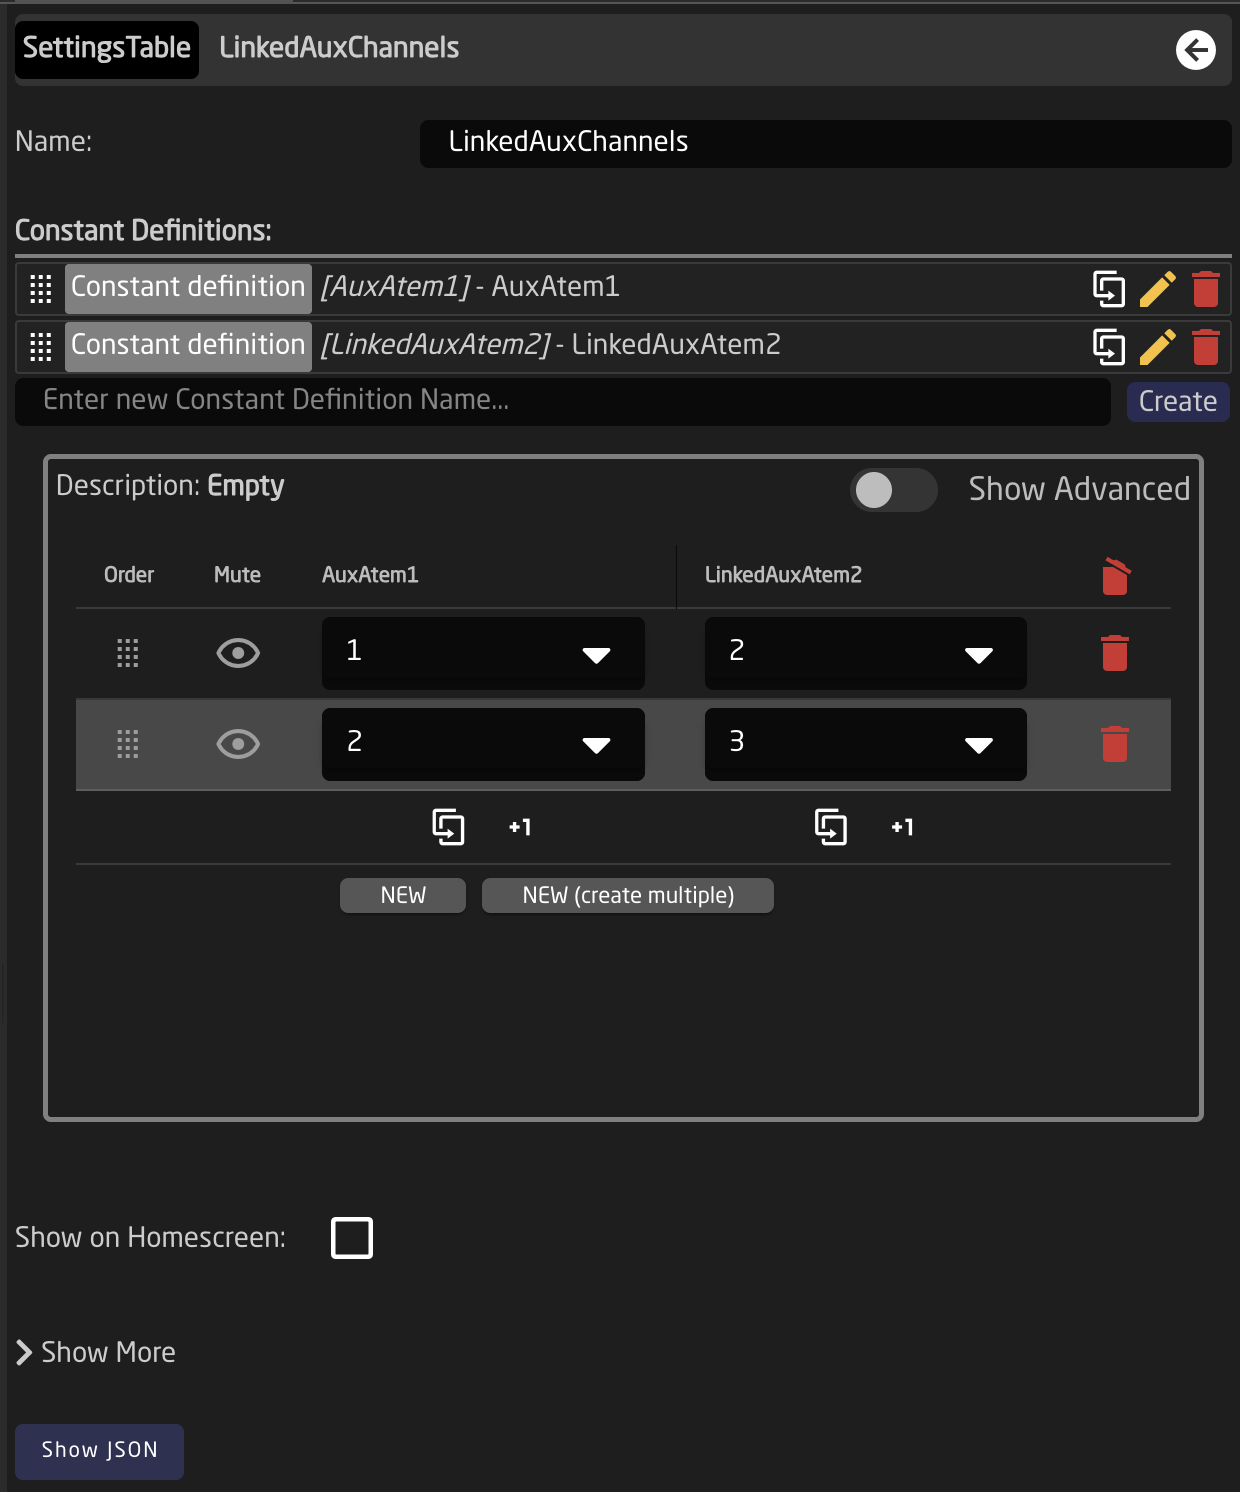
To get started let's create a Settings Table on our Controller. It will have 2 columns: AuxAtem1 and LinkedAuxAtem2. We can add 2 entries for linking AUX1 of our first Mixer to AUX2 of our second mixer and AUX2 of the first to AUX3 of the second. (This example assumes two ATEM Mixers with more than 4 AUX Outputs)
The Settings Table should look like this:
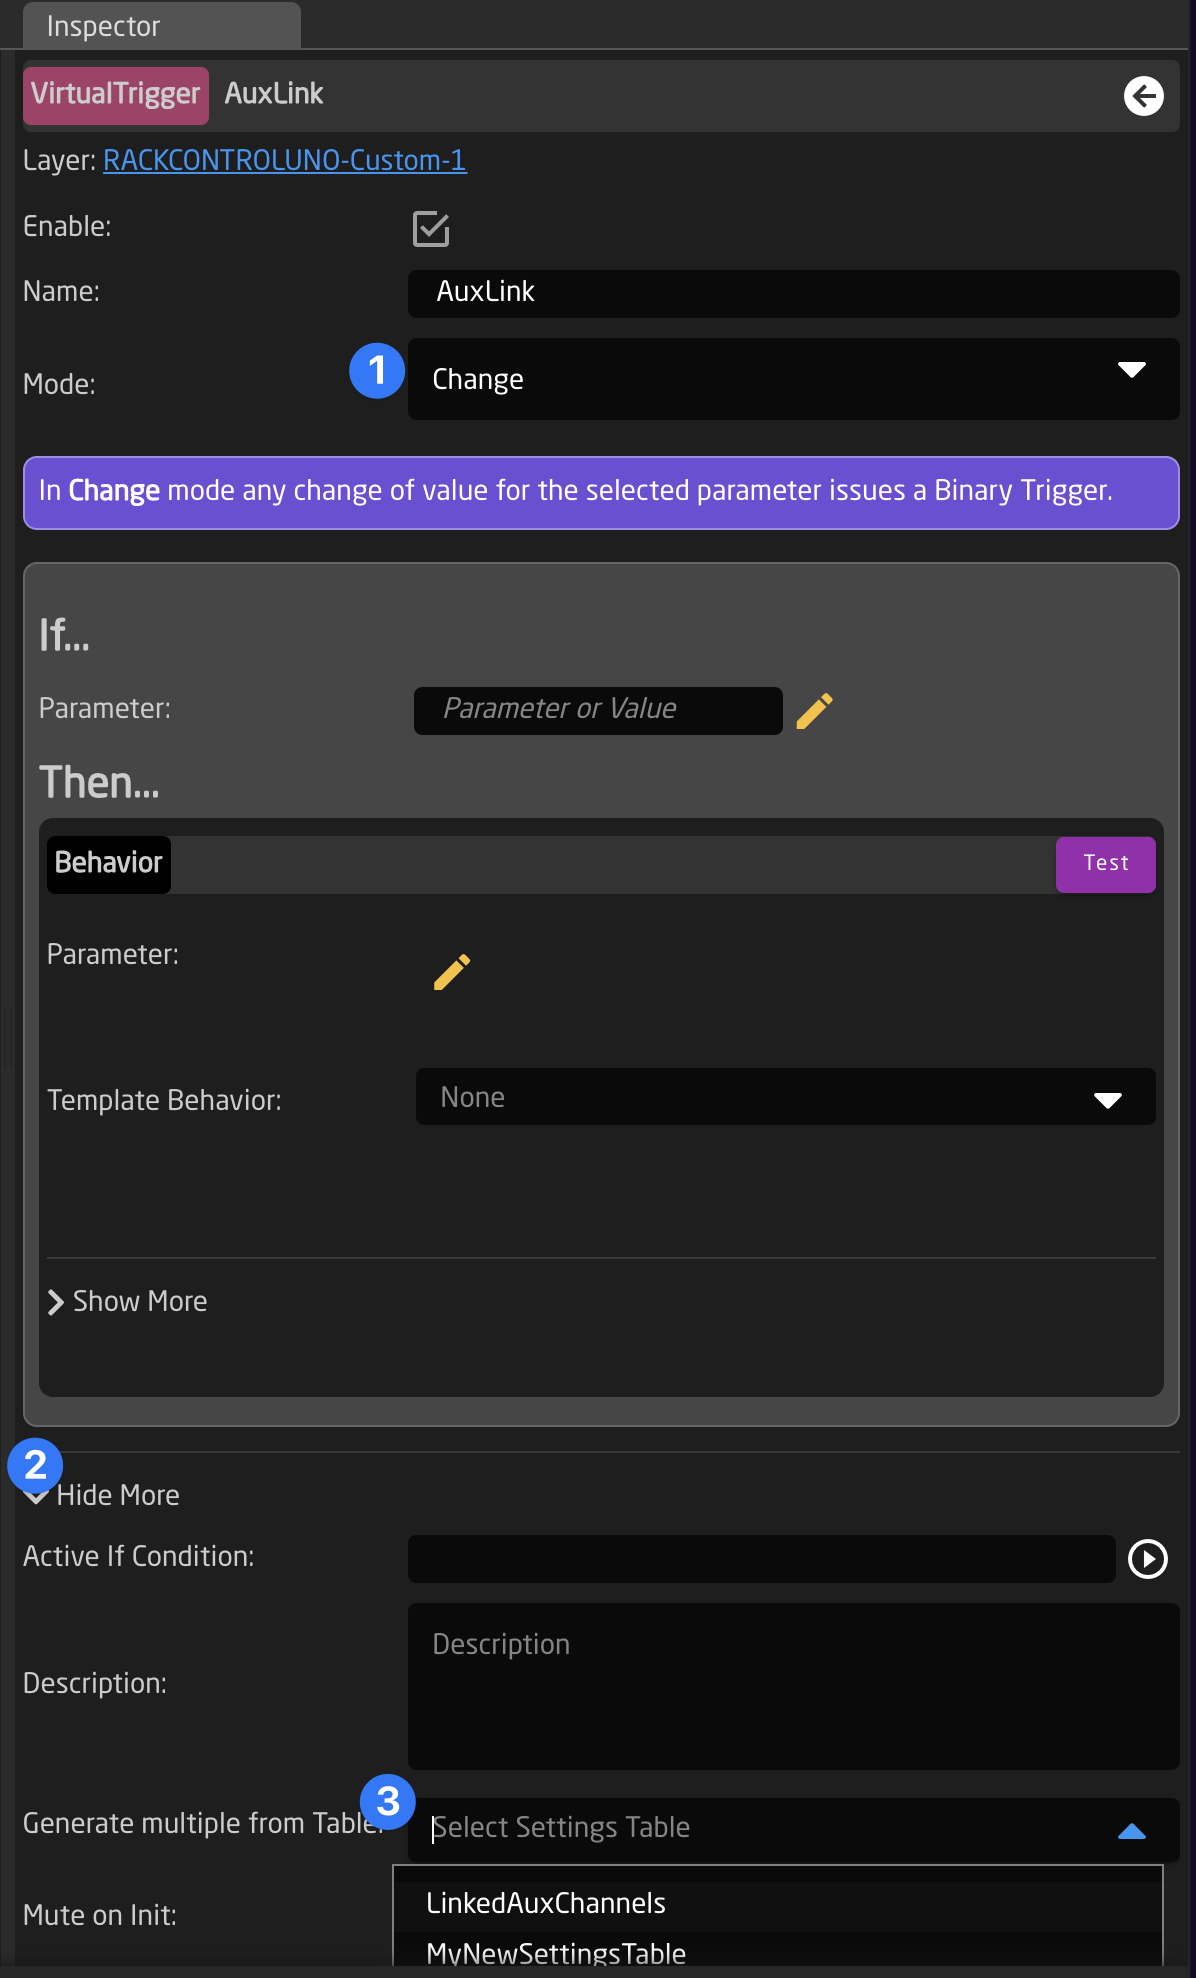
Then we click the controller again and add a new Virtual Trigger. The Type we will use should be Change. Click 'Show More' in the Virtual Trigger Inspector and scroll all the way down. Select the Settings Table from the dropdown in 'Generate multiple from Settings Table'
It is good to do this step first, as it will now ensure that the names of the table columns will show up in the Parameter Helper Window when we configure our Virtual Trigger.
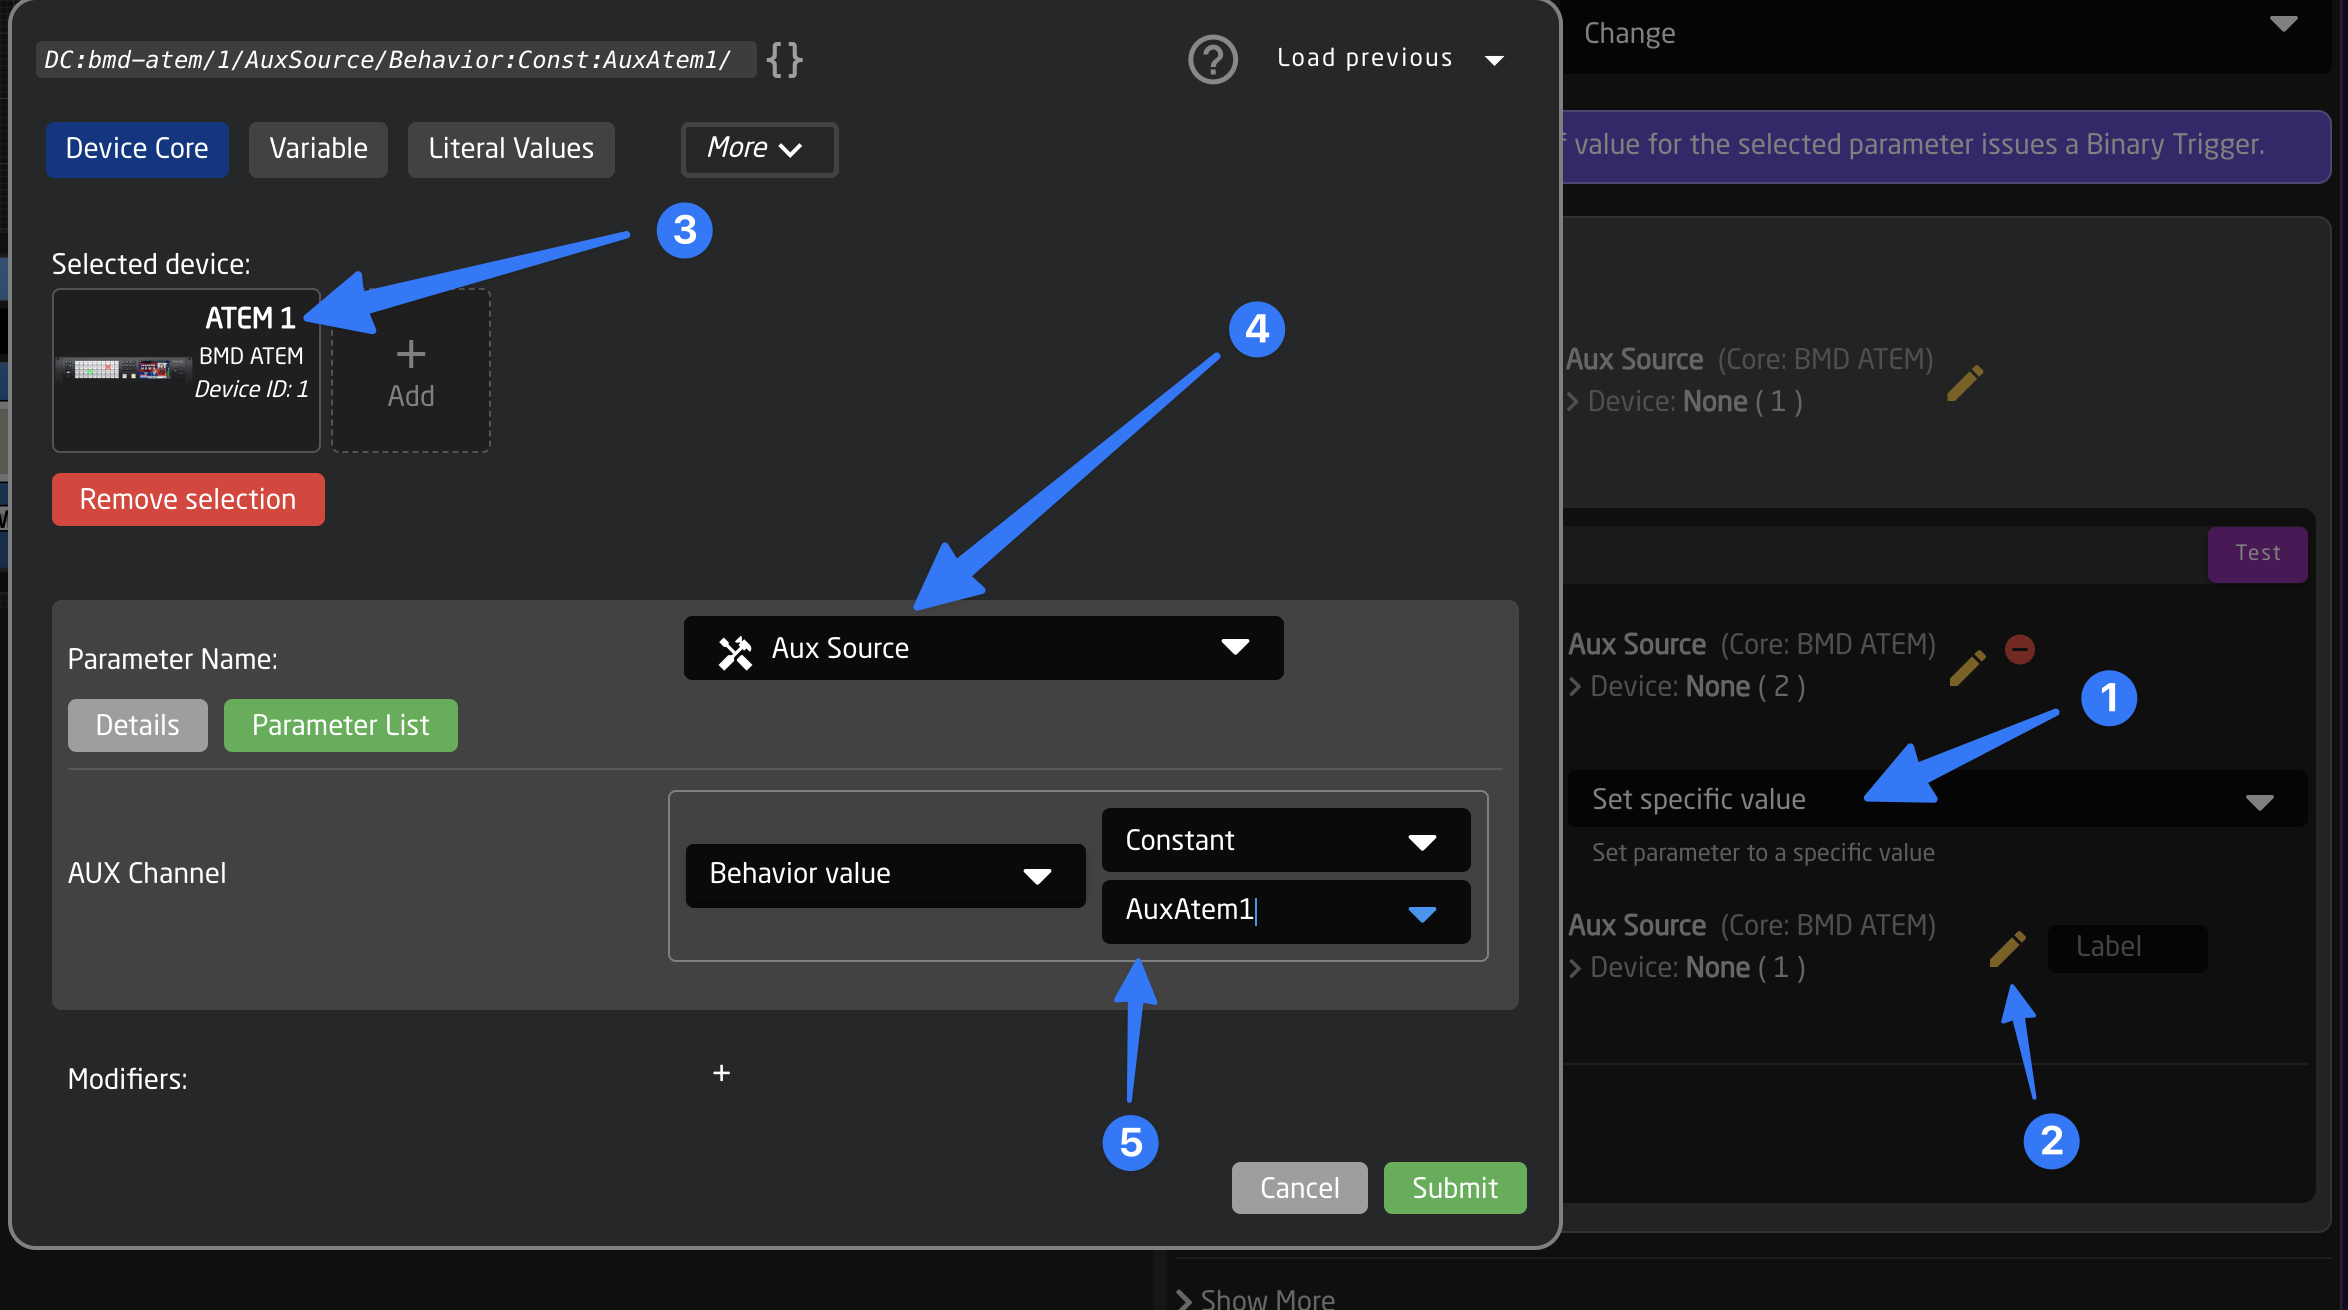
Next select the parameter to monitor. We select the ATEM 1, Parameter: AUX Source, and for Aux Channel: Field:AuxAtem1. This represents the first column from our table.

Now we select the parameter in the Behavior (the Then section of the Virtual Trigger). The parameter we want to set this time will be the ATEM 2, Parameter: AUX Source, and for Aux Channel: Field:LinkedAuxAtem2.
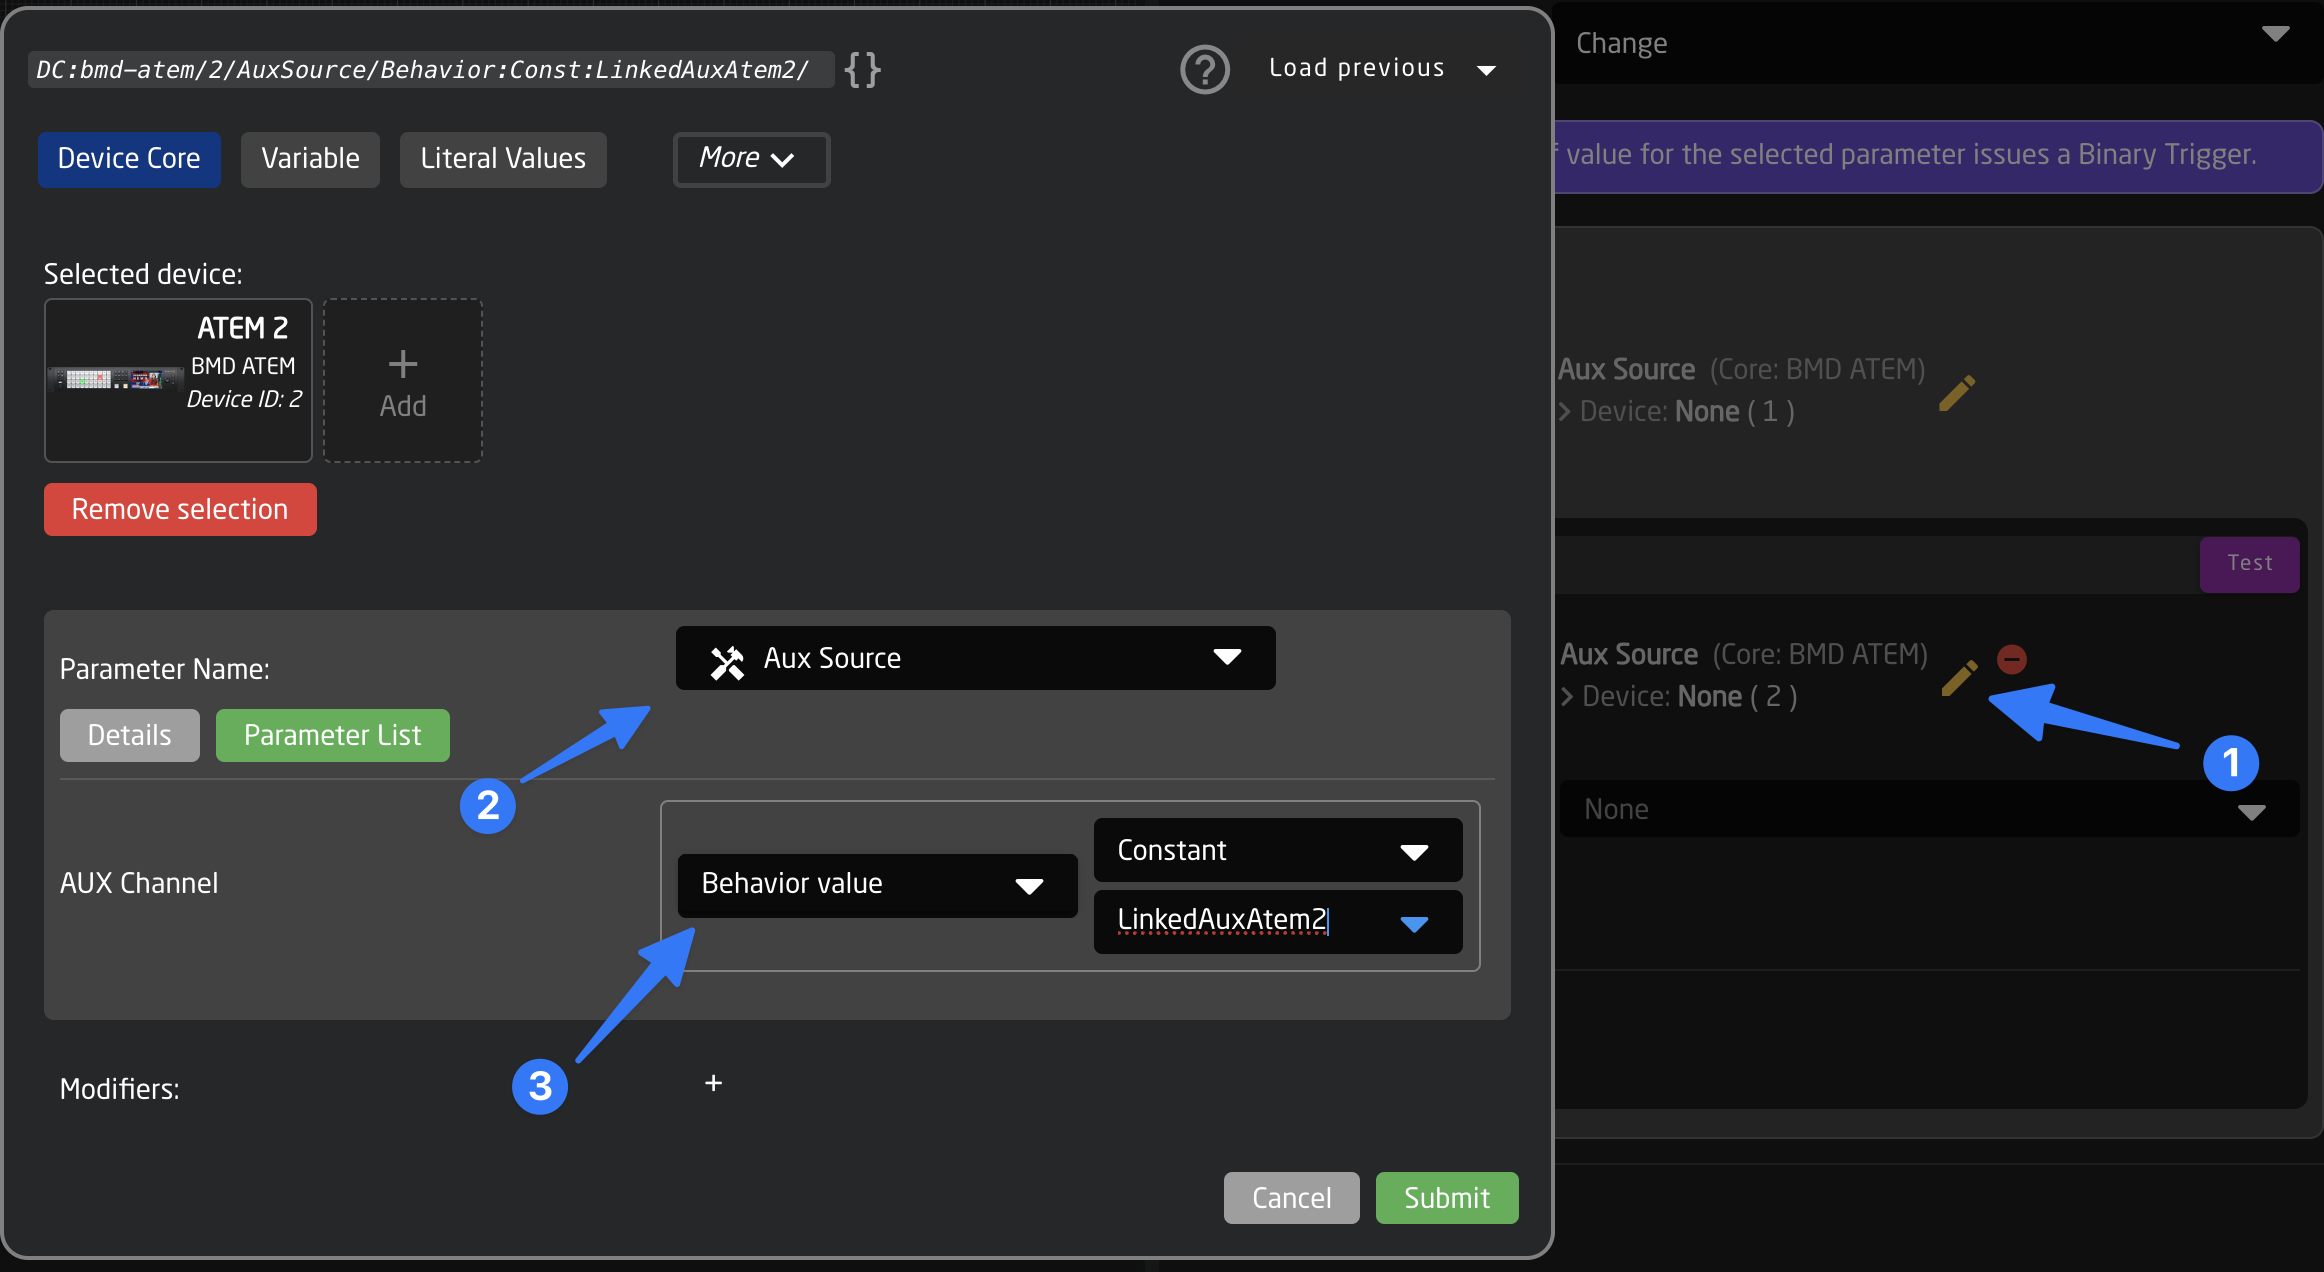
Important Note: This time the Automatic Behavior Configuration will not help us, so we select "Keep current" when asked, and select "Set specific value" in the Template Behavior Dropdown ourselves.
Finally we need to select the Value that we want to set into the second mixer's AUX channel. This will basically be the same parameter reference as we used as the trigger: ATEM 1, Parameter: AUX Source, and for Aux Channel: Field:AuxAtem1
Done! 🎉
Reactor will now create a separate VirtualTrigger for each row of the table and execute when a change happens.
We can now change the first ATEMs Aux channel 1 or channel 2 and should see the change on the second mixer AUX 2 and 3
Generators
Generators are the second piece of the puzzle if you want to use Settings Tables to dynamically create parts of your configuration (Behaviors and Layers). When a Generator is created on a layer it can create behaviors and even new sub-layers. It needs to be noted that only one generator can be created per layer.
Think of a Generator like something that can generate several pages of layers and behaviors based on a template
There are several different Types of Generators with different functions.
- Behavior Generator: The most common type, used to create 'pages' layers for a larger amount of behaviors.
- Channel Pages: Mostly used in AudioConfigs, where an entire Layer gets repeated. (eg: a channel group on the Waveboard, consisting of Fader+Display+GainEncoder, hence the name of this type)
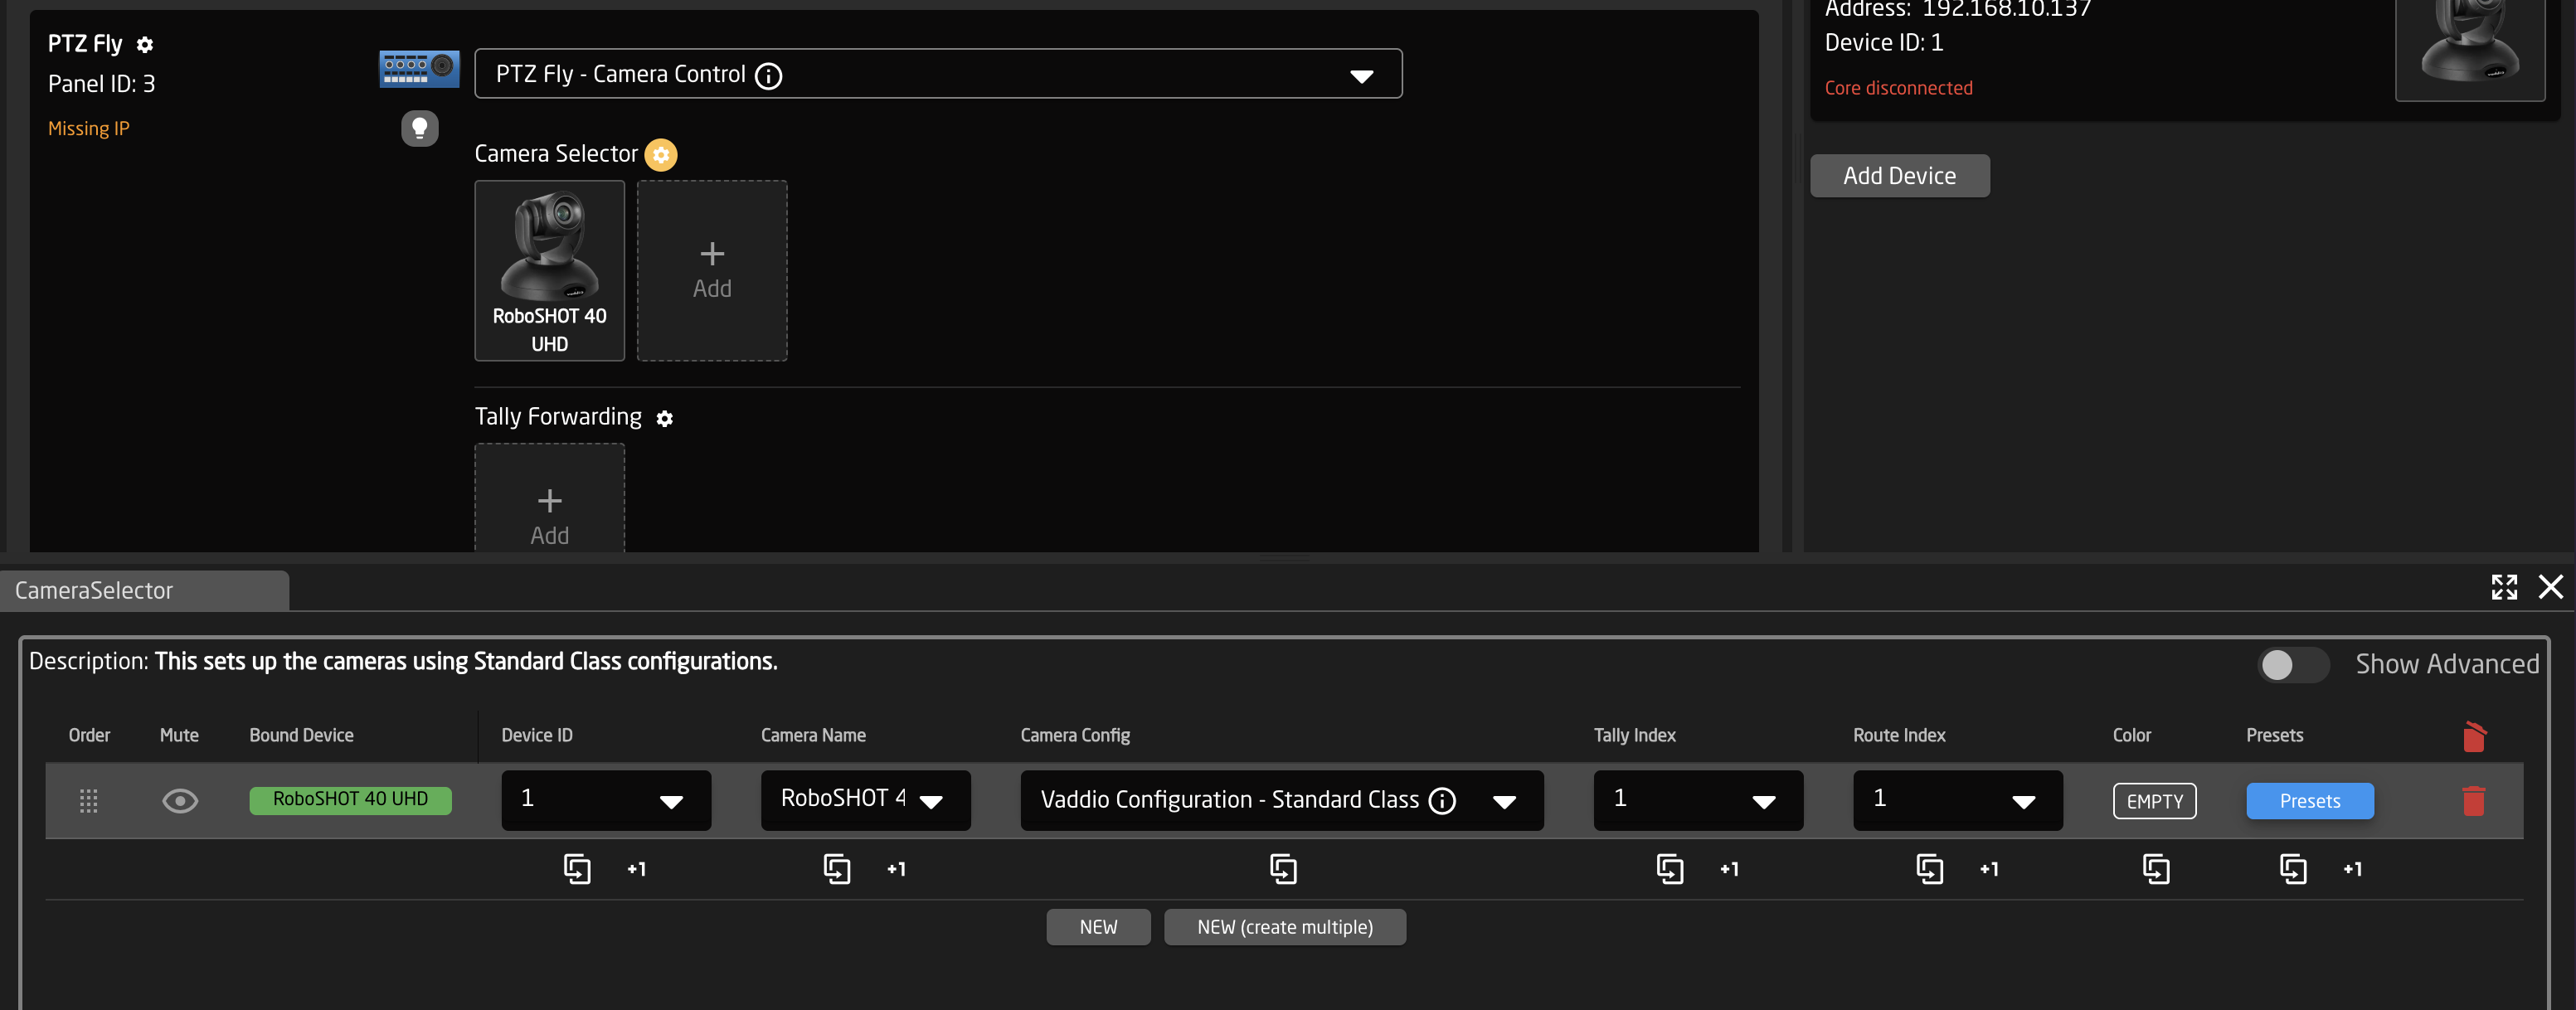
- Import Config Selector: Used to include a specified Configuration Snippet on a sub-layer, most commonly used in the Camera Selector.
For now we only have a example and sufficient UI support for the first type Behaviors. For the other types you will need the JSON Editor to specify the exact layer and behavior templates.
Example: Creating Pages of behaviors for a row of buttons
Often we need a row of buttons to perform a very similar task, for example a Preset Recall or a Video Input Selection. This means that all buttons (or other components) in this row will often use a very similar Behavior, with minor changes from button to button, like a different preset number, label or color. Sometimes we might also want to create several pages of these buttons (for example preset 1-20 mapped on a row of 5 buttons and one paging button)
We can achieve this by copying the same behavior on all of the buttons and working with the Batch editor, but that gets tedious quickly, and does not provide a lot of flexibility after the fact.
To solve this task in a more elegant way we can create a Settings Table first, that will hold all the preset numbers and labels. Then we will use a Generator to turn the rows of the table into several pages of behaviors for the buttons. Finally we will map the page variable to a button, so we can cycle through them.
Lets get started:
First click anywhere on the controller you want to use to select its main layer, then open "Show More" and create a new Settings Table. we will call it "Presets"
Now click the new Table and add some Fields (Columns). We will add a Preset Number, a Label and a Color. After creating click on the individual Field Definitions and change their types accordingly to "Integer", "String" and "Color". Optionally also enable 'Show on Homescreen after you are done with everything' After doing so your Settings Table should look like this:

Now we switch to the Homescreen to edit the contents of our table
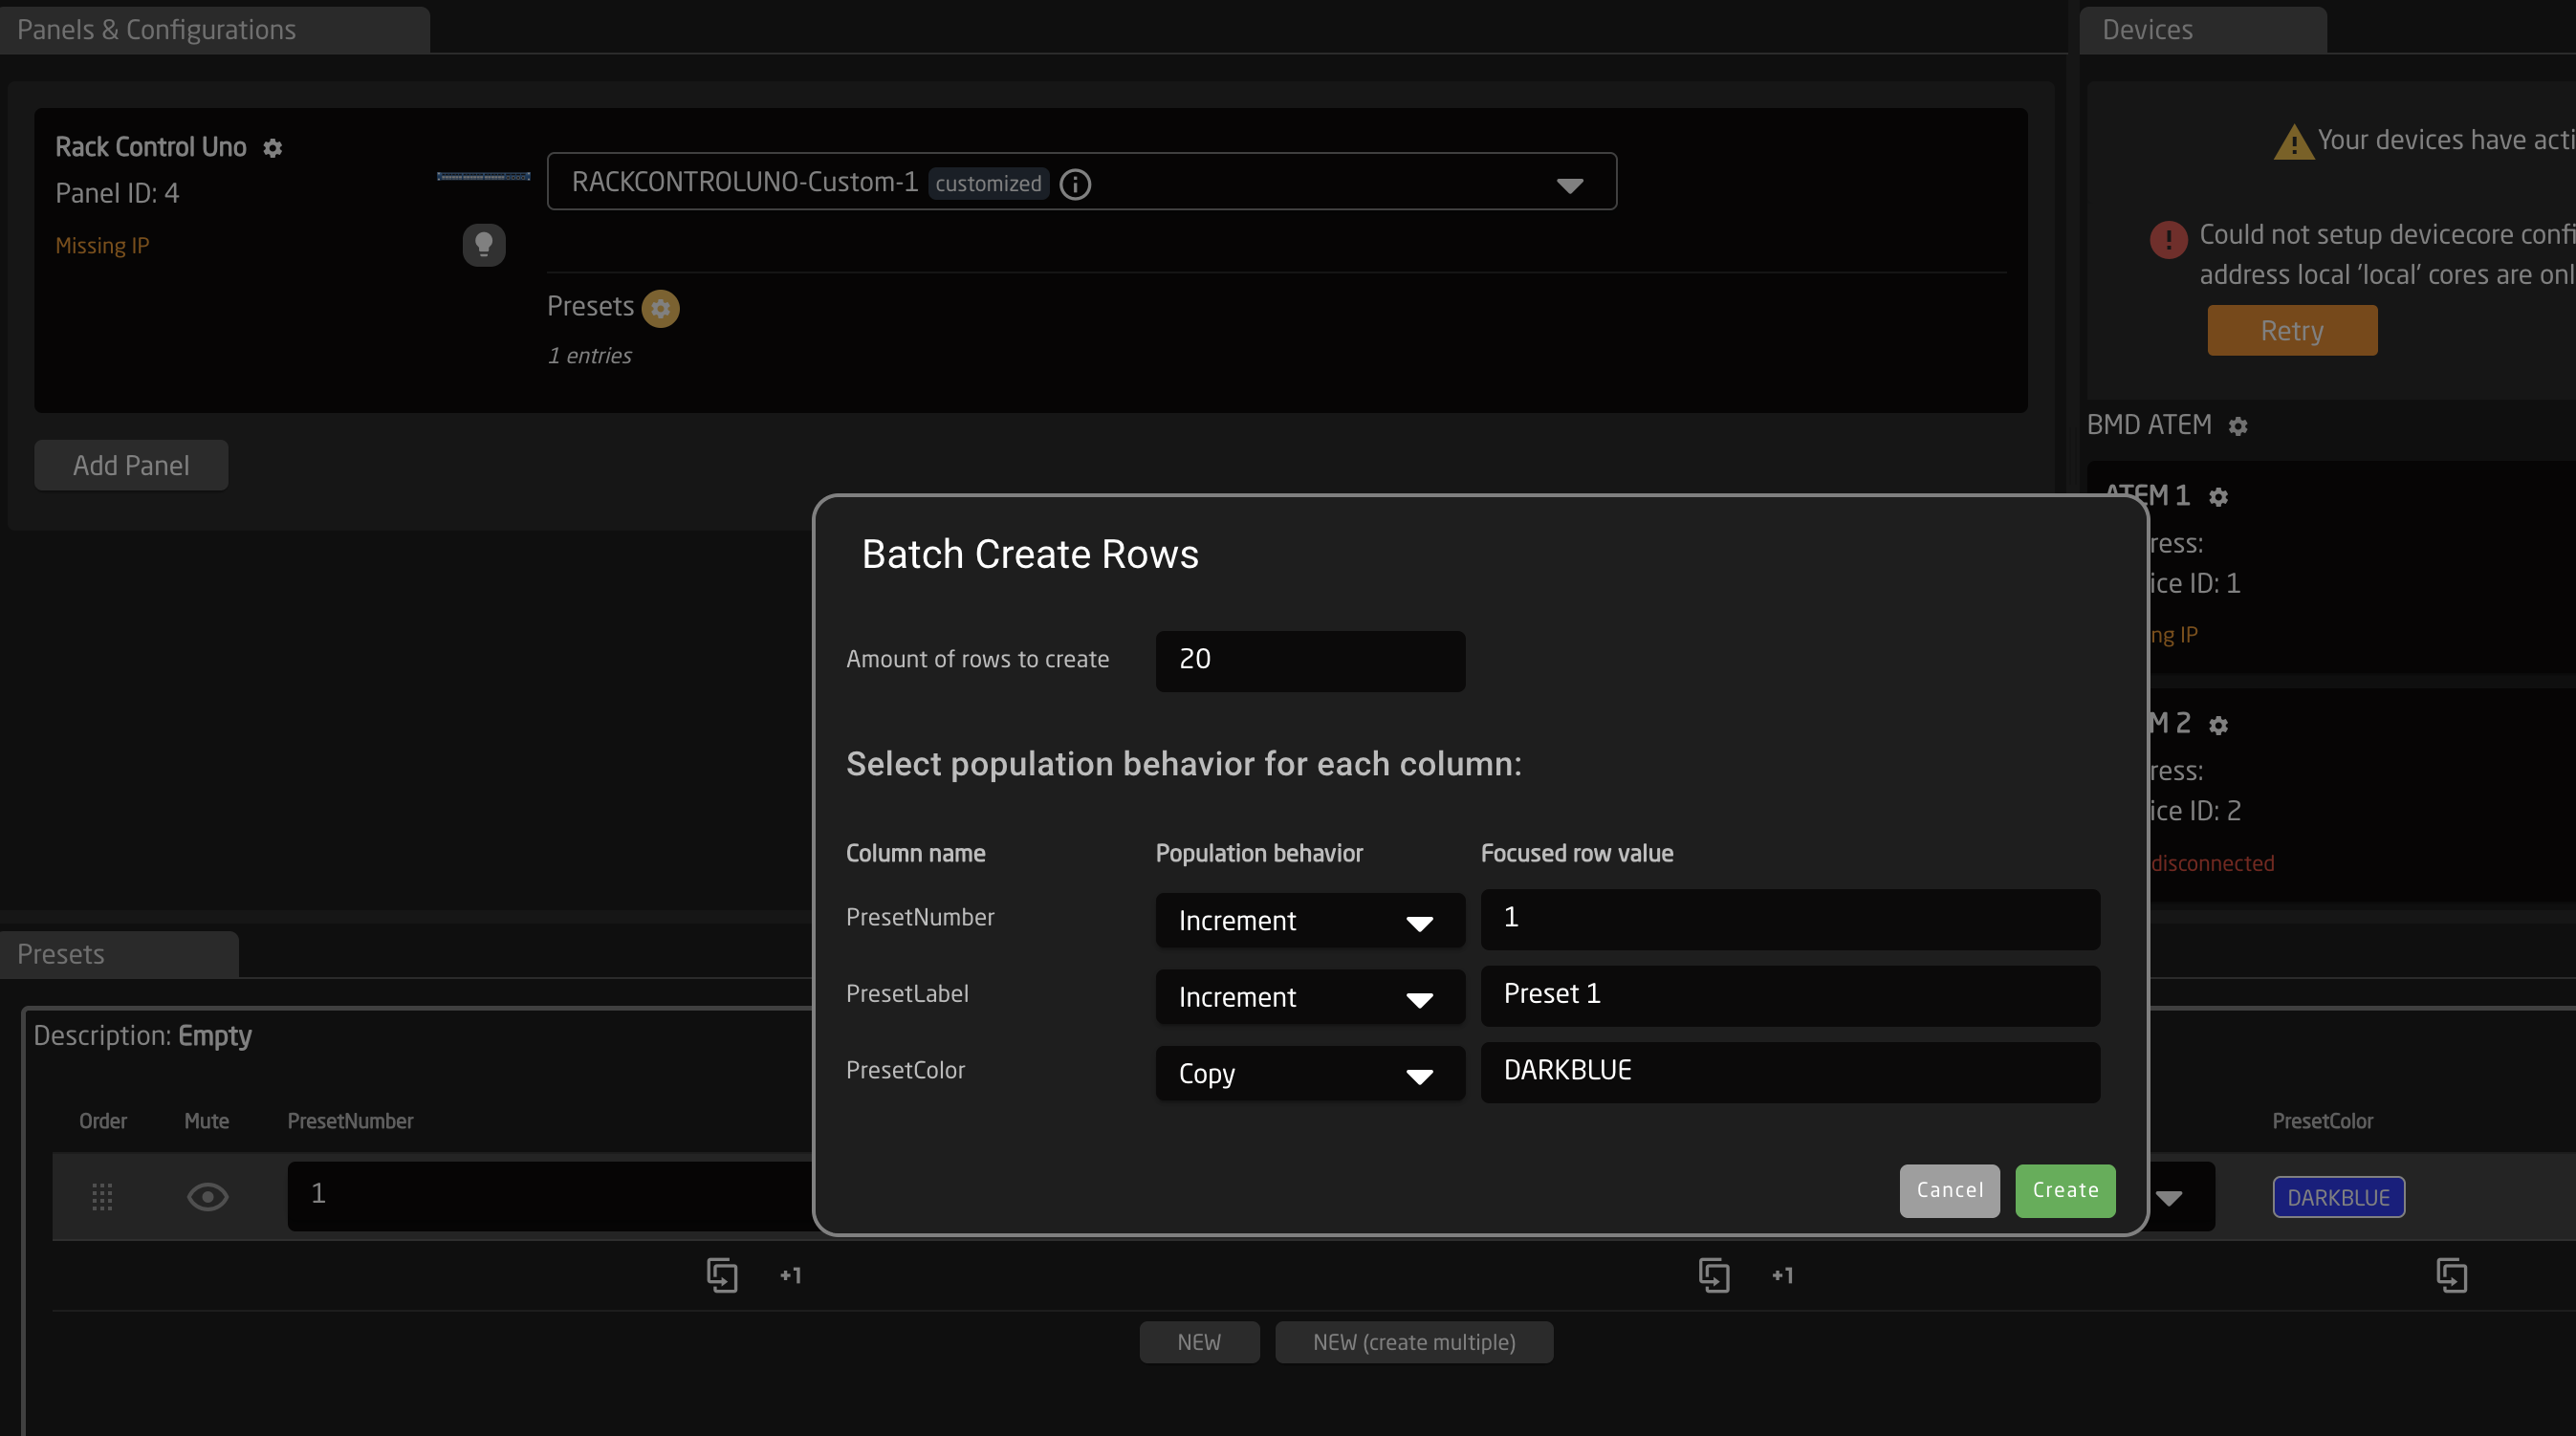
We can add several rows to our set. After adding a first row we can use the (then visible) "New (multi)" Button to create our 20 Presets
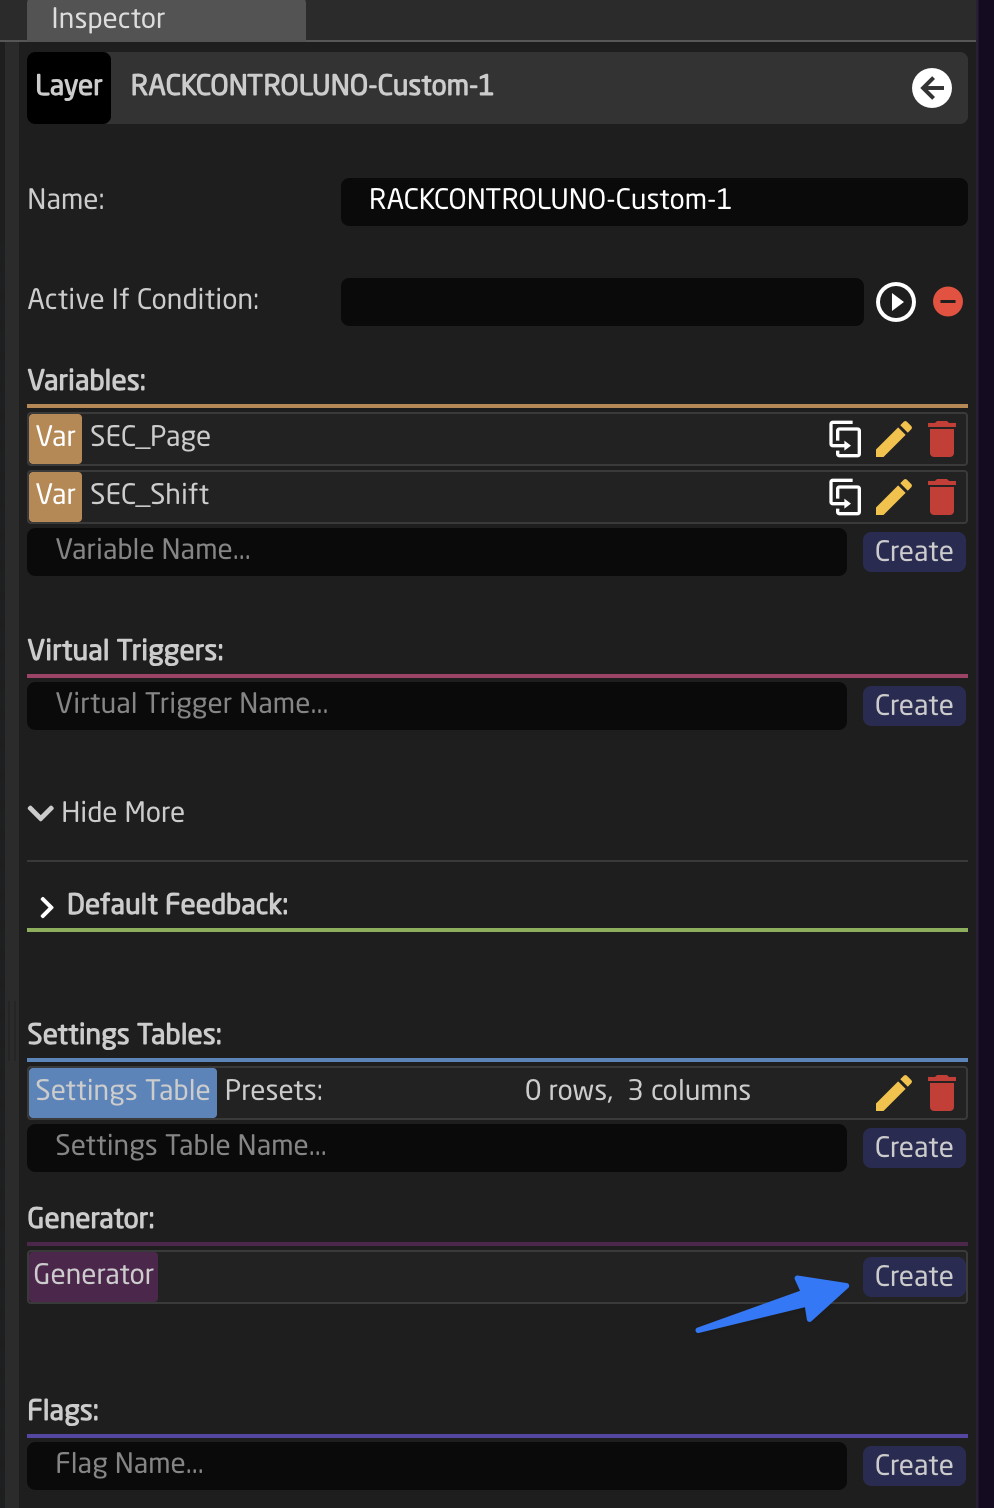
Back to the Configuration Tab, click the controller again to select it's main layer, now let's create a Generator to turn the rows of the table into Behaviors.
Keep in mind that only one generator can exist on a layer, sso if you need several generated elements on your controller you need to add these on new sub-layers
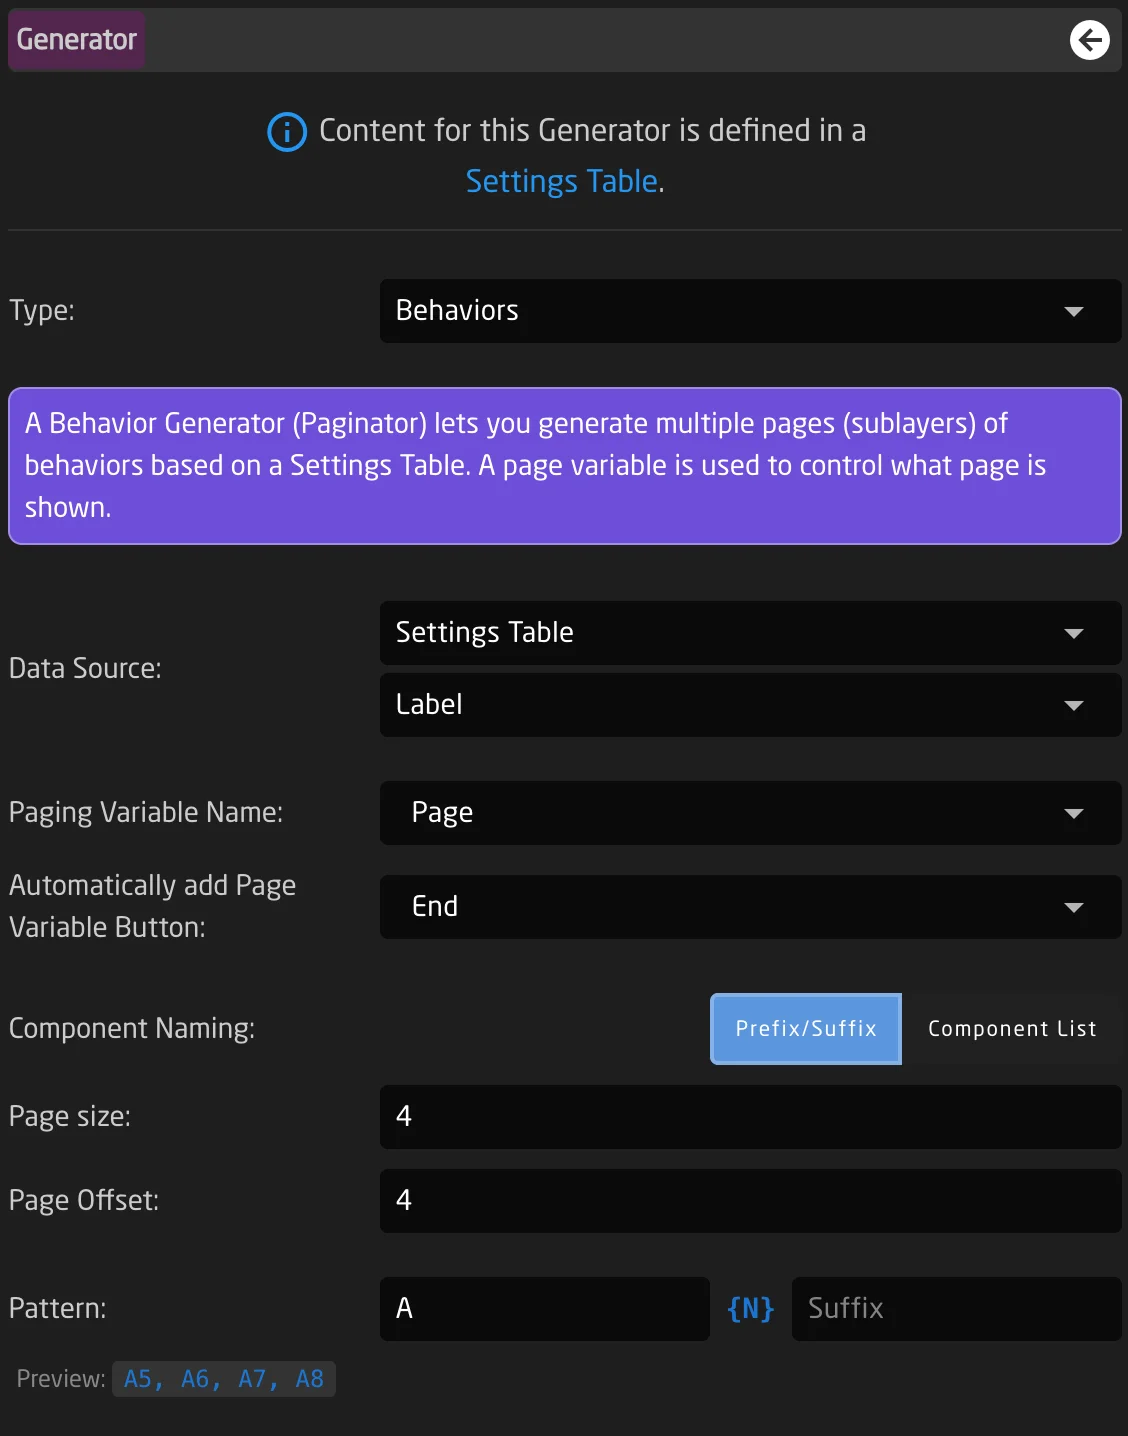
Select the Settings Table created in the beginning as the Data Source for the Generator. You can also override the default name of the page variable (this variable will be created automatically by the generator if it does not exist already). In this example we name it PresetPage.
Choosing a Component Naming Mode
Next, you need to tell the Generator which hardware components (HWCs) it should address. The Component Naming toggle lets you choose between two modes:
- Prefix/Suffix (default): Components are addressed using a naming pattern like
{Prefix}{N}{Suffix}, where N is a sequential number. Best when your components follow a uniform, sequential naming scheme (e.g., X1, X2, X3...). - Component List: You explicitly specify each HWC alias as individual entries in a list. Best when your components do not follow a sequential pattern or when you need fine-grained control over which specific components are addressed.

Prefix/Suffix Mode (default)
In this mode, the Pattern fields determine how the new behaviors map to your controller. Enter a Prefix (and optionally a Suffix). The generator will create component aliases by combining Prefix + sequential number + Suffix (e.g., prefix "X" generates X1, X2, X3...).
You can only choose HWCs with continuously named key labels. If this is not the case on your particular controller, a KeyMap is needed to correct for that. In our example our prefix will be X.
Specify the page size and optionally a page offset to adjust which components are addressed. We leave them on 4 for size and empty for offset.
Component List Mode
If your components don't follow a sequential naming pattern — for example, you need to address components named "Enc1", "Fader2", and "Btn5" on the same generator — switch to Component List mode. In this mode, you specify each HWC alias individually rather than relying on a prefix and number pattern. Page Size and Page Offset settings are not used in this mode; the list itself defines which components are addressed and in what order.
The Component List provides several tools for building your list:
- Add button: Creates a new empty entry in the list. Type the HWC alias name into the text field.
- +1 button (increment): Takes the currently focused entry and appends a new entry with its number incremented by one. For example, if the focused entry is "Enc1", clicking +1 adds "Enc2".
- Eyedropper/Picker button: Activates picking mode. While active, clicking any component on the panel graphic adds its alias to the list. Duplicates are automatically skipped. Click Done when you are finished picking.
- Drag to Reorder: Each entry has a drag handle on the left. Click and drag to reorder entries. The order determines which component gets which row from the Settings Table.
- Delete icon: Each entry has a red delete icon on the right. Click it to remove that entry from the list.

Component List mode is especially useful when building generators for controllers with mixed component types — for example, a row of encoders and faders that don't share a common prefix, or when you want to skip certain components in a sequence.
Configuring the Template Behavior
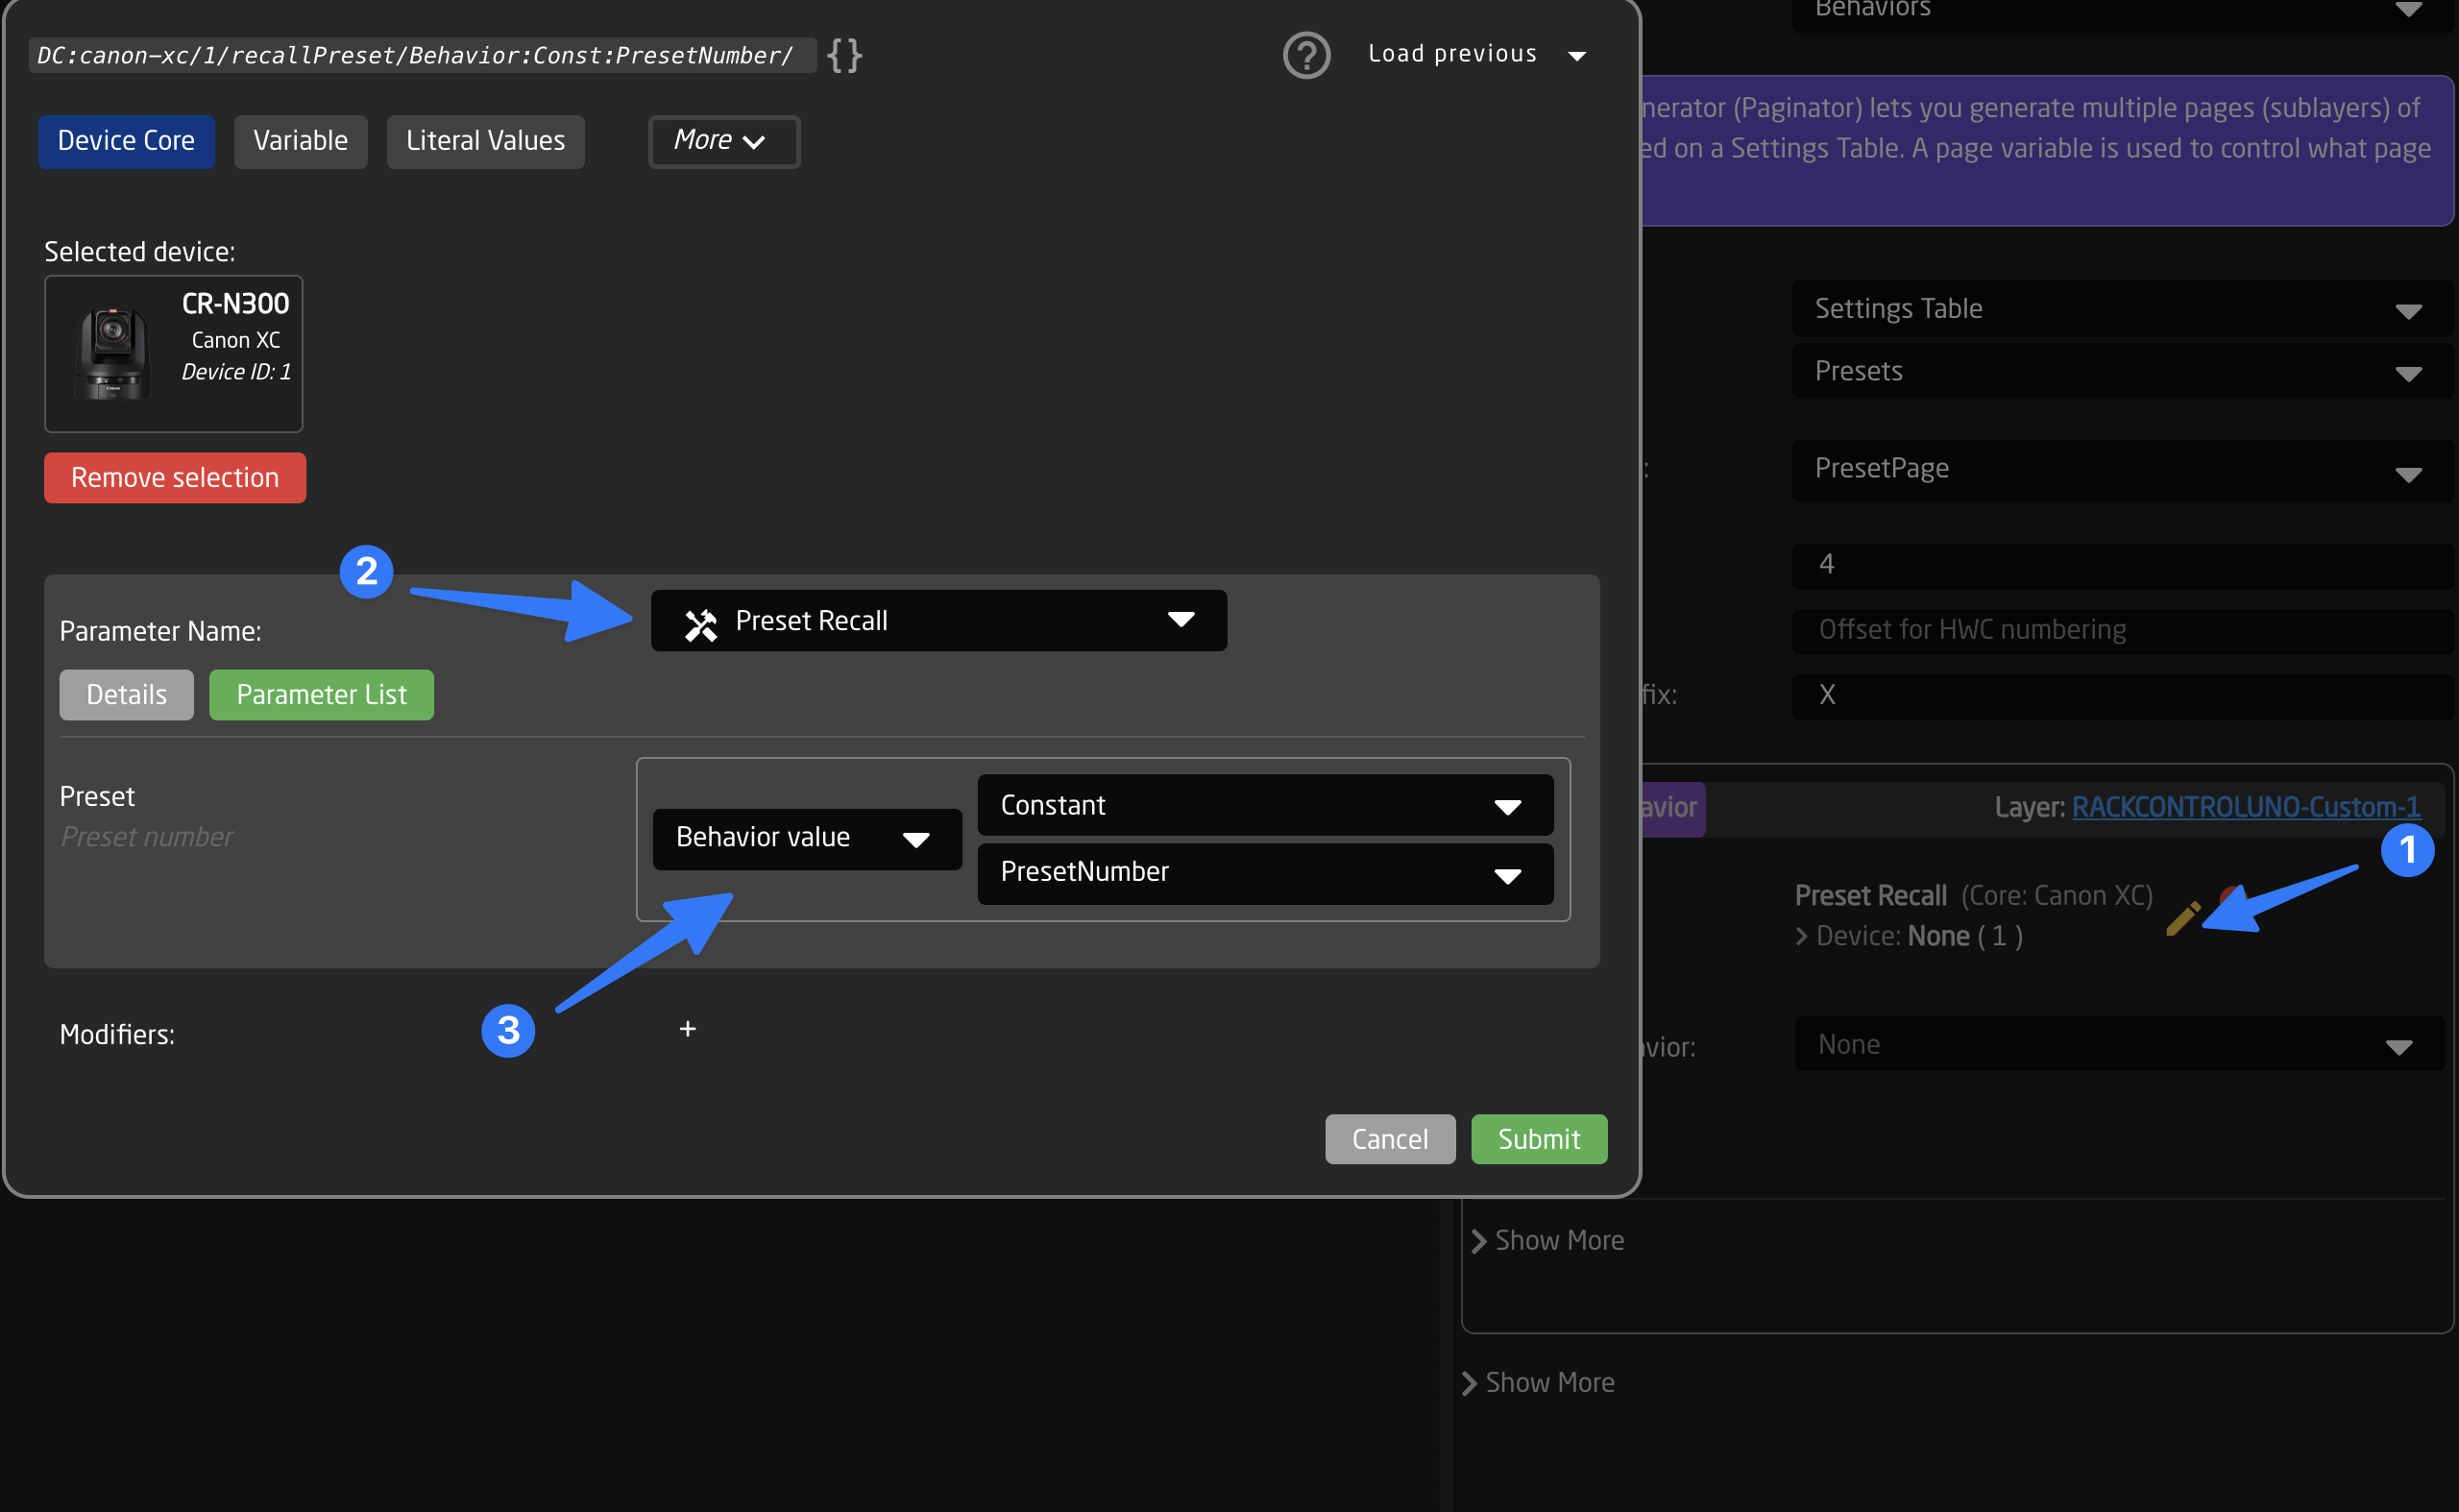
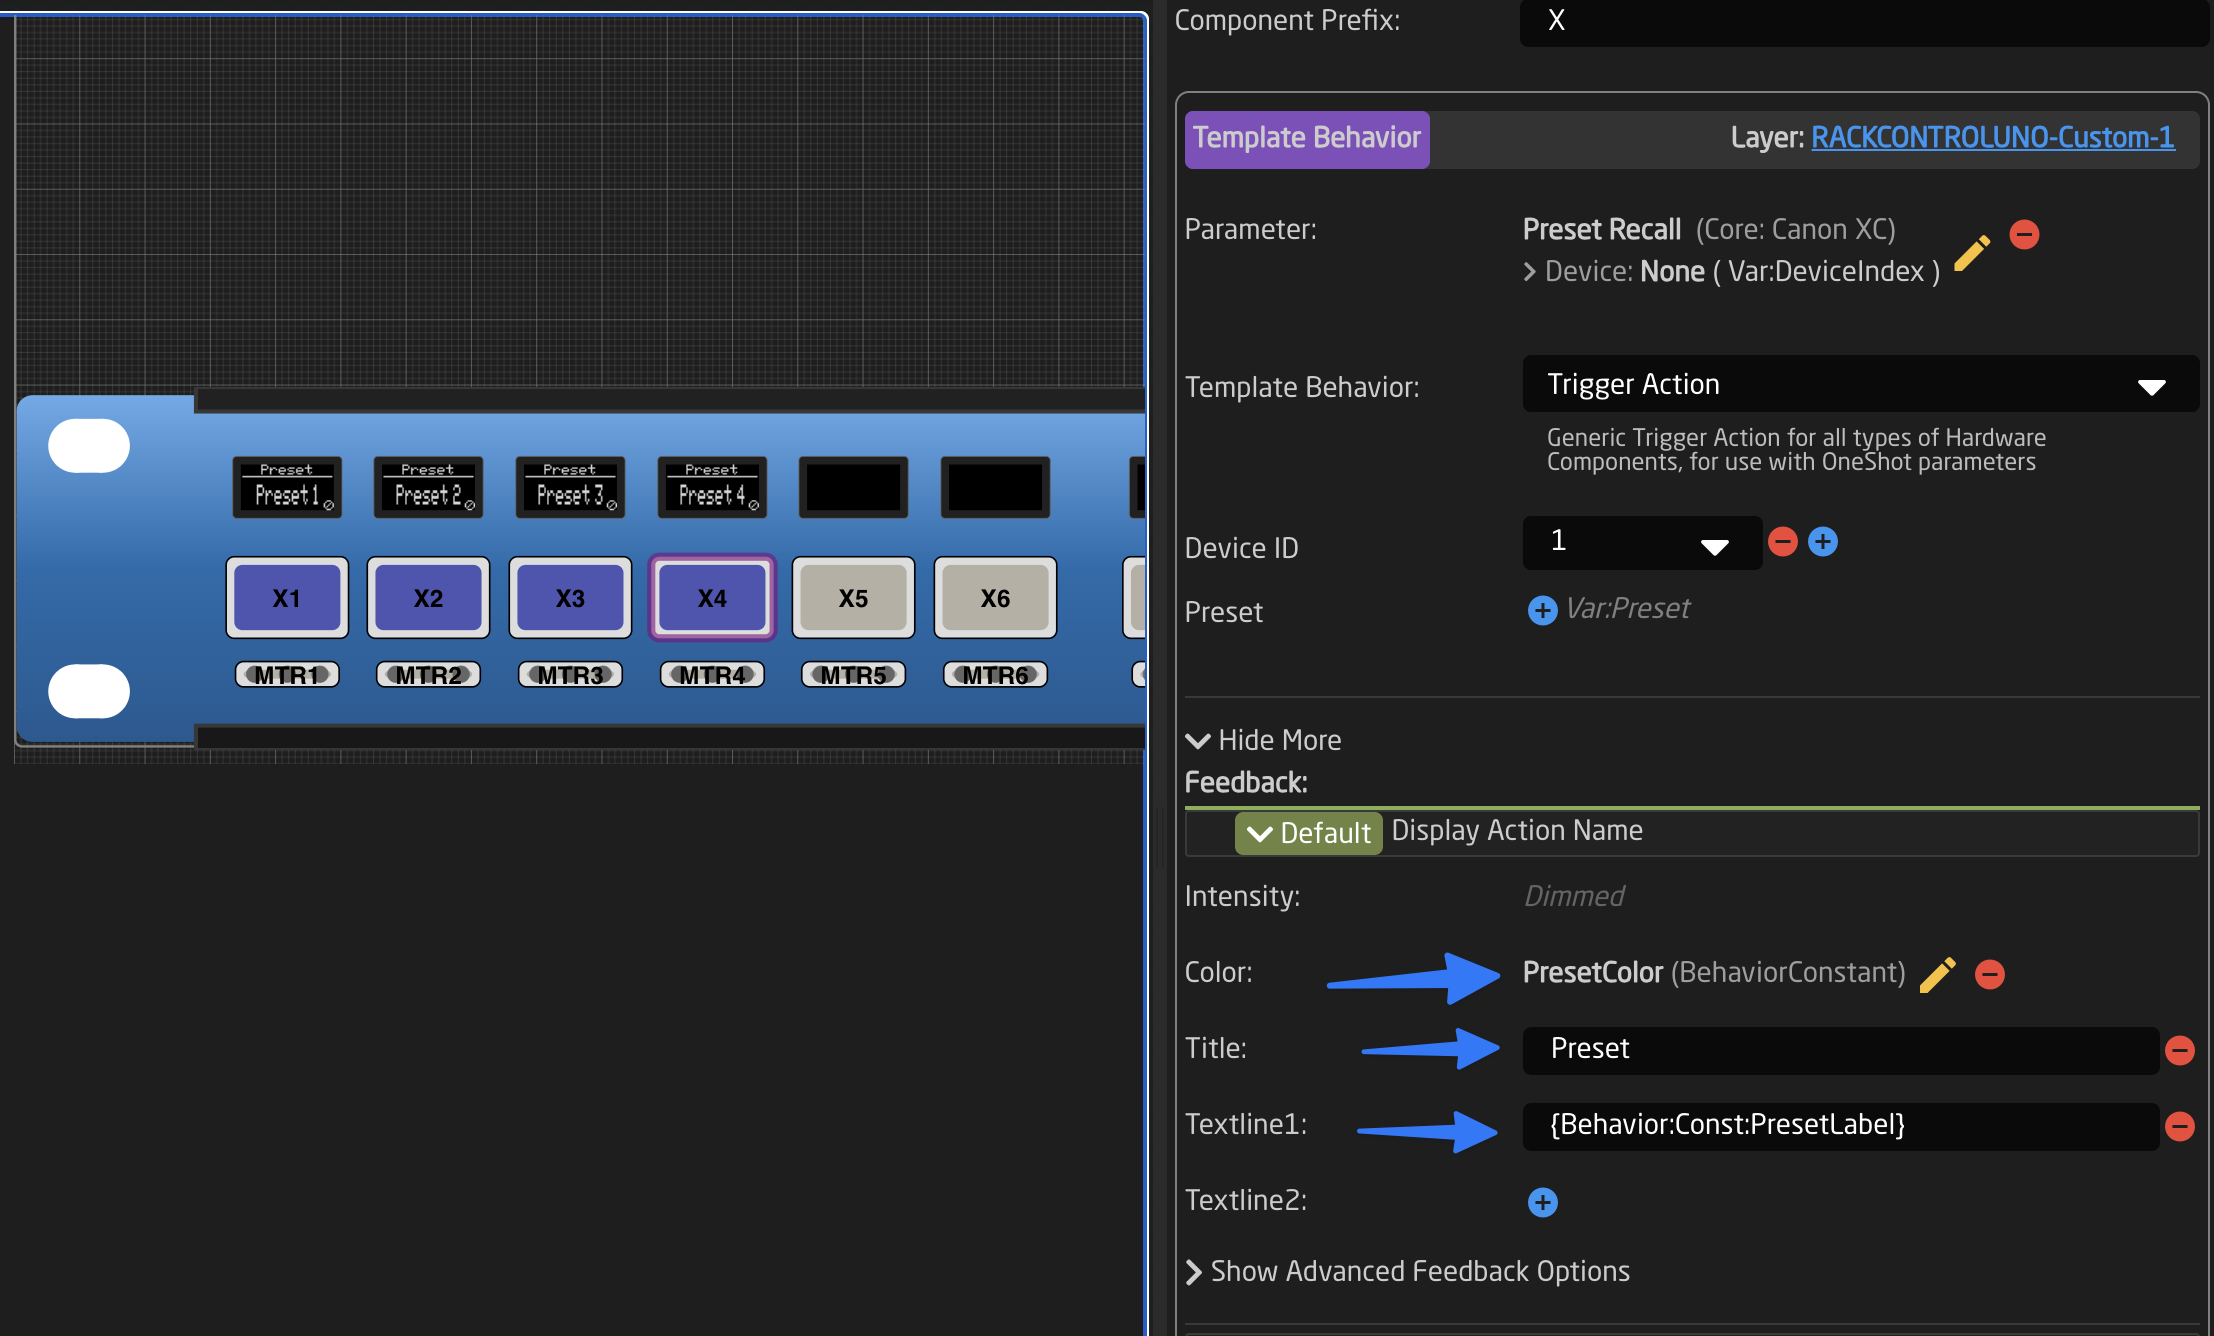
Now we need to configure what content is put on our buttons. To do that we select the template behavior, for our example we will select a PTZ Preset Recall function from the Canon Core. For the Preset Number we can select Field:PresetNumber.
For the label and Color we need to add these to the feedback. Use the same method of selecting the Field Value to access the field from the original Settings Table in the Behavior.
Configuring the Page Button
As a final step we need to map the generated page Variable to a button, to be able to change the current page. Todo that click the next button and select the Page Variable as the parameter on a fresh behavior.

Done! 🎉
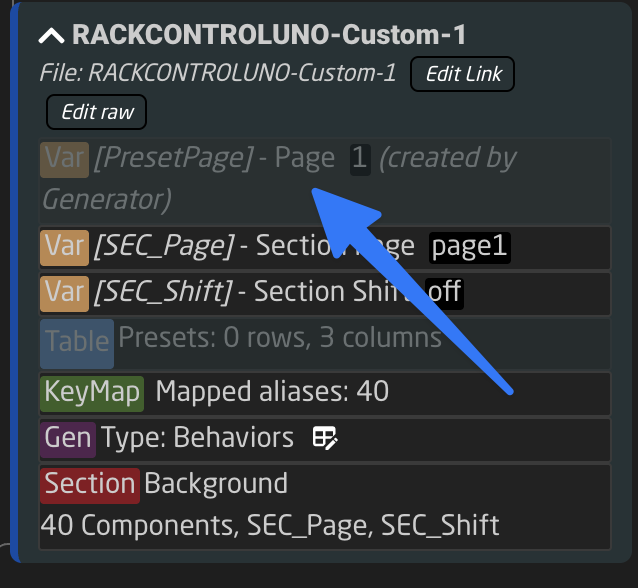
Reactor will now create as many sub-layers as needed, with one behavior for each row of the table. The table content can then be changed and the pages will be automatically updated. In the tree you can now see all elements that are managed by the generator in purple:

Summary
Settings Tables and Generators can be a bit intimidating at first, but when used properly they can be a super powerful tool to take your configurations to the next level. Feel free to explore the use of generators in our default configurations, as there are many tricks to find there.